So, you can make cornice boards out of foam board… who knew?
(Apparently tons of people cuz there were lots of examples on the interwebs). So when I decided to redo our master bedroom I started with the idea of adding cornice board window treatments. I did some research and found lots of examples of people using everything from craft foam board (which was way to flimsy for my taste), to styrofoam (which we’re getting better as far as stability), then foam insulation board.. NOW you’re onto something! Now I know some people don’t like the cornice board and think they are outdated… but I say, whatever you love, you should do it!
Well the Mean Man had a source for some free 2″ foam board (that had been used for shipping) so he grabbed up a couple of big pieces. I told him I think I needed at least 17 deep and, to be safe, about 50″ wide (I hadn’t really done any serious measuring at that point and I was knee-deep in winging it). He got a couple of nice big pieces so we were in business!
This is a CHEAP project even if you have to buy the board- it’s around $8 for a huge sheet. I got my fabric at Hobby Lobby for a total of $25.18 (because it was 30% off), the fringe was $17.98 (because I had a 40% off coupon) and the batting was $5.98 (cuz it’s just cheap) so for under $55 after tax, I got two beautiful windows treatments!

Now, I fortunately have a very capable assistant (actually he’s my partner in crime) who helped with the measuring. This was very dicey as we didn’t have just a ton of clearance between the window and the wall. The fact that the foam board was almost 2″ thick also came into play. I also had fluffy curtain panels we had to take into consideration. I’m going to answer all of the questions I had when I started researching so I hope this isn’t a beat down of info.
1. Measure for your width. Our window was 35″ wide. We then had to determine how far past the window we wanted the boards to go. To do this, we added 4″ to each side off the width measurement. We took into consideration the width of the curtain rod and the fluff of the curtains. The rod went just past the frame.
2. Then for depth: Now, if you hang curtains under your board you need to figure for the rod. We used a 2″ curtain rod (it comes off the wall 2″). I had to consider the fluff of the curtains as well (this is to determine how deep to make the cornice). I wanted about 1″ clearance past the rod then I added 1″ for the curtains. So to add it all up 2″ rod + 1″ curtain + 1″ clearance past that = 4″ for the depth of my boards (for the returns, legs, or whatever you wanna call the side pieces).
3. Determine how long you want your boards to be. The standard seems to be to take the length of your window or window coverings in my case, divide that amount by 5 and take 1/5 as the length of your boards. My window coverings were 82″ so I came up with a little over 16″ and decided on 17″.

It’s now time to transfer your measurements to the boards for cutting. Be sure your boards are in square! Marty added the measurements we wanted to the boards, used a straight edge to draw the cut lines, then cut with a jigsaw.
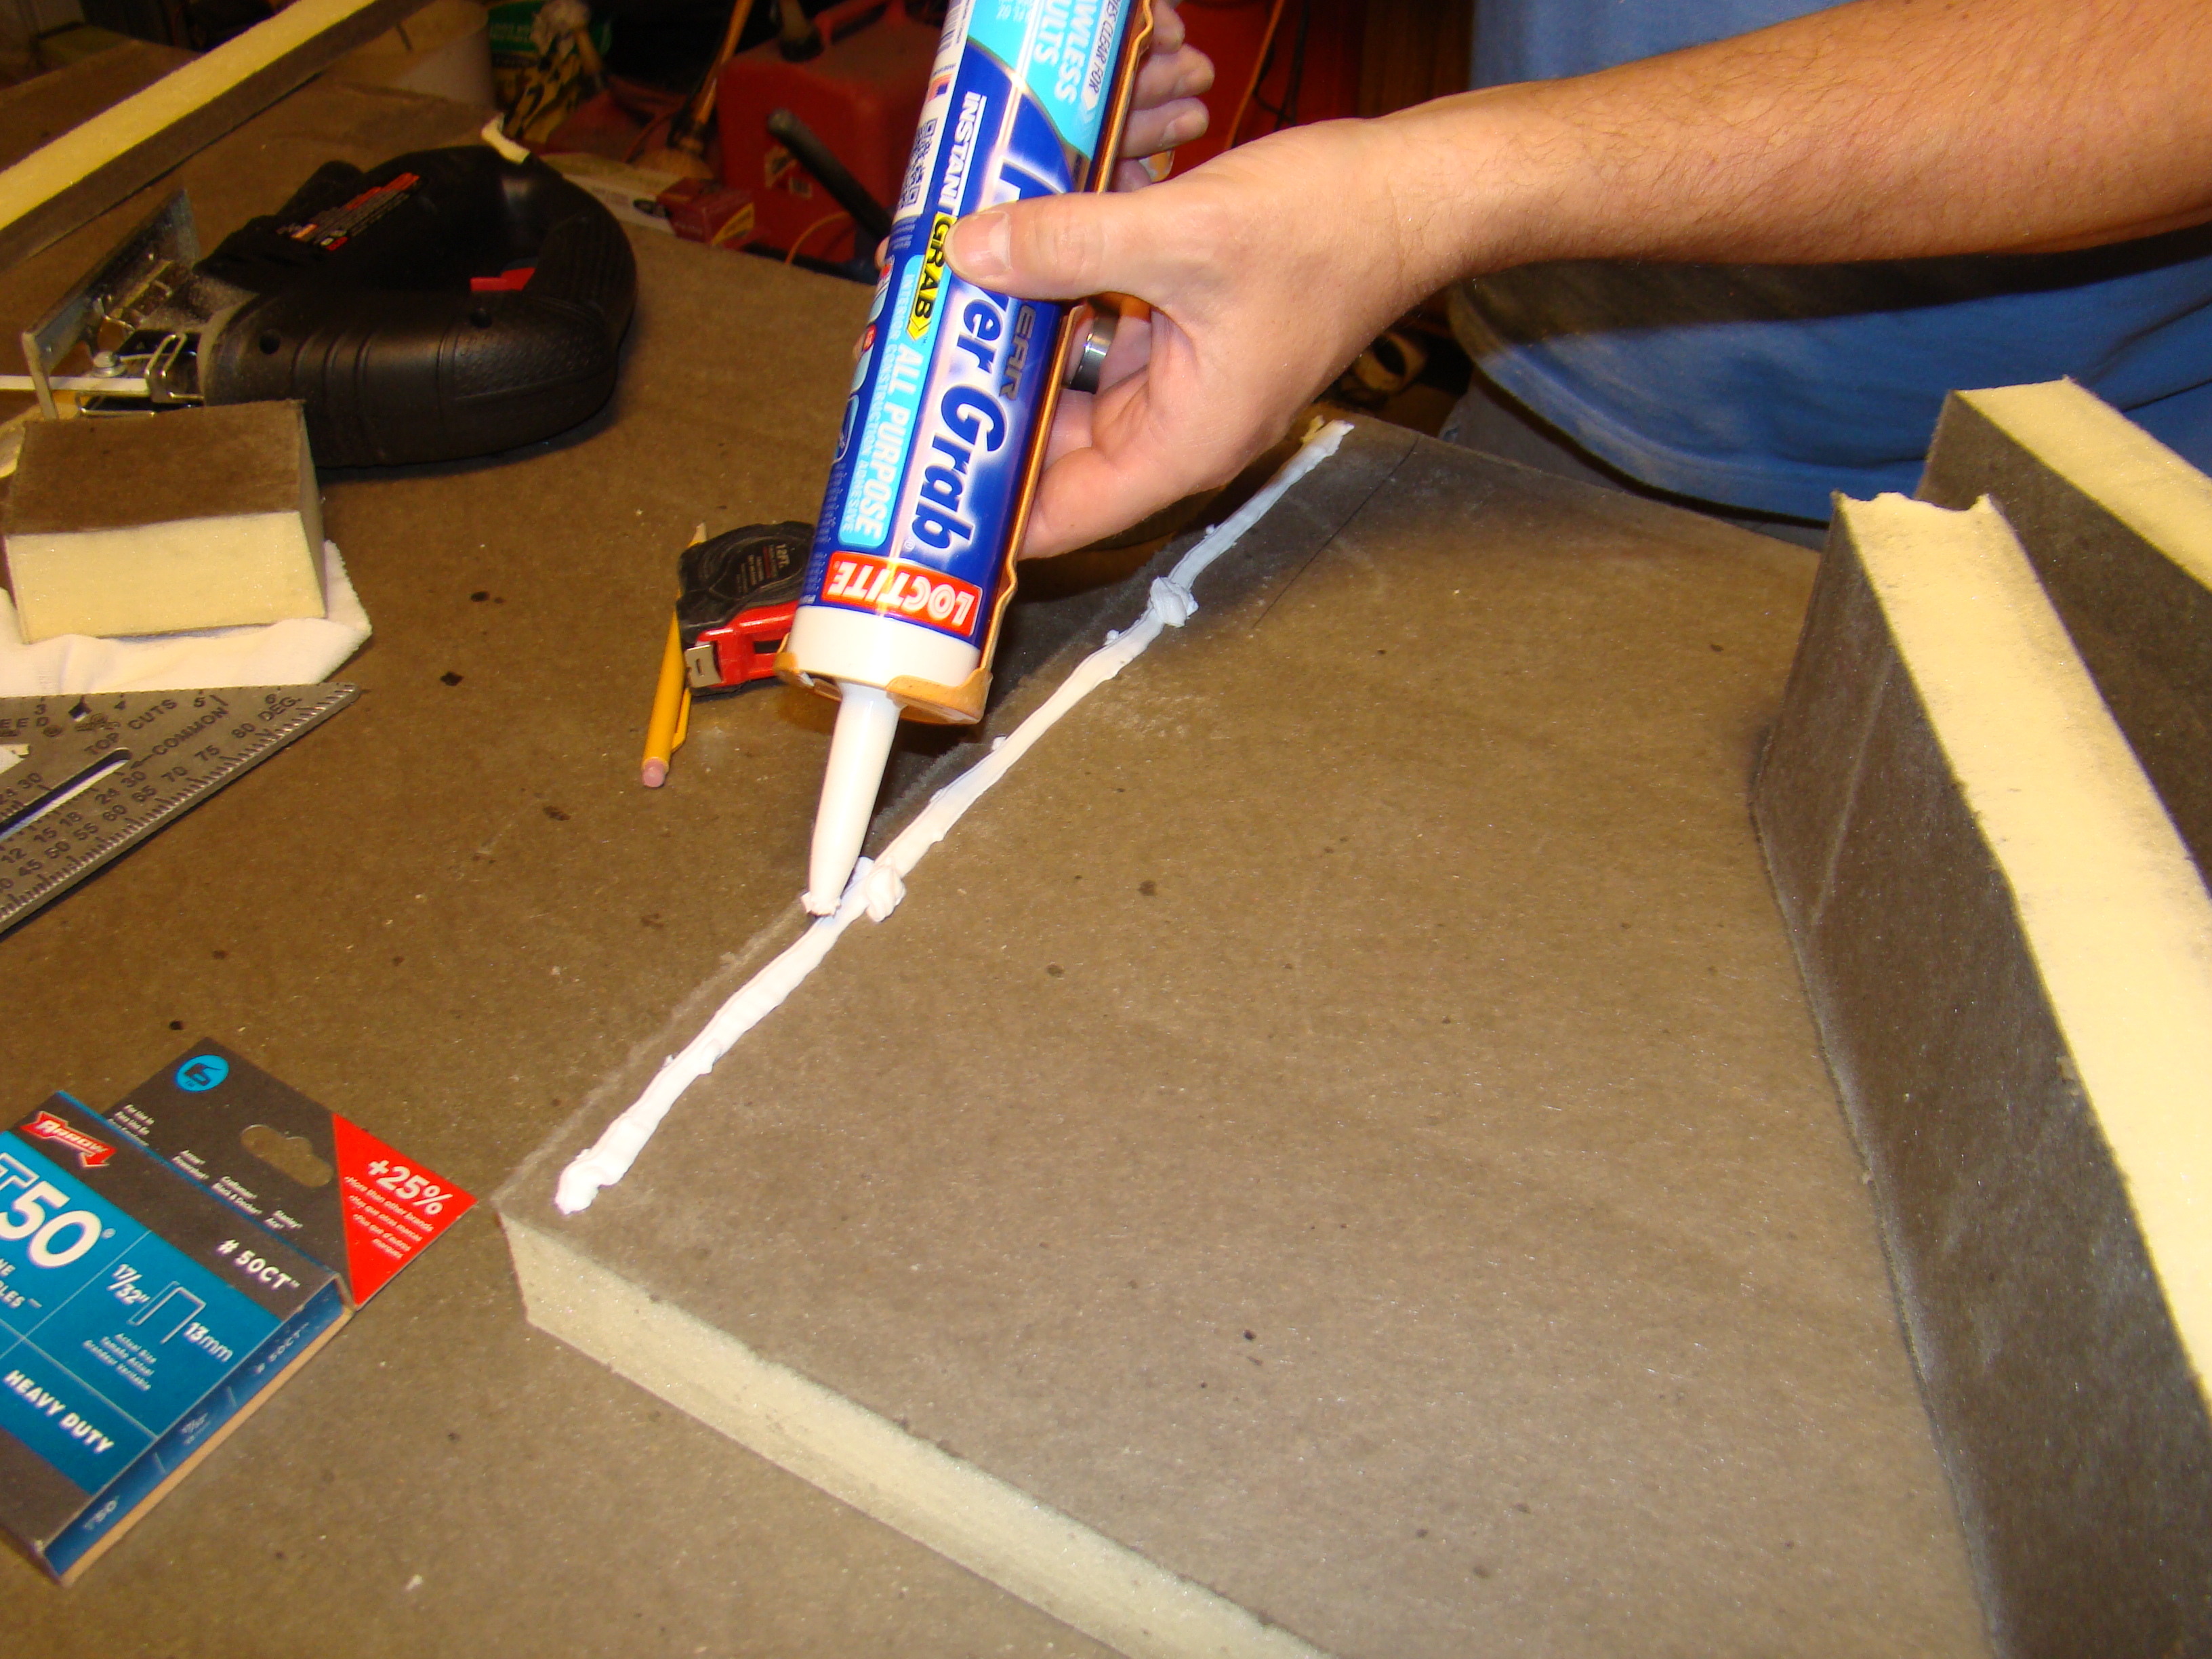 Time to glue up all of the pieces. Our side pieces are 4″ x 17″ (4″ is the depth we wanted the board and 17″ is the length). Then we cut the top piece that is glued between the two side pieces. We wanted our boards as secure as possible so instead of using hot glue as lots of sites suggested, we used Loctite to hold the pieces in place.
 We actually used toothpicks to shore up the whole structure.
After we had everything put together and glued up… we waited… OVERNIGHT. It’s just not worth risking that the glue isn’t all dried and tight.
 Before we added the batting, we covered all edges in duct tape. Our board had a nice paper covering over all of the foam except for what was exposed after we made our cuts. We wanted all of the foam covered, plus this further firmed up the boxes. You can see we used very thin batting. We didn’t want our boards to appear heavily upholstered. (Also- it looks like the Mean Man is doing all of the work- FALSE, I just had to stop to take pics so you guys can see how we did it).

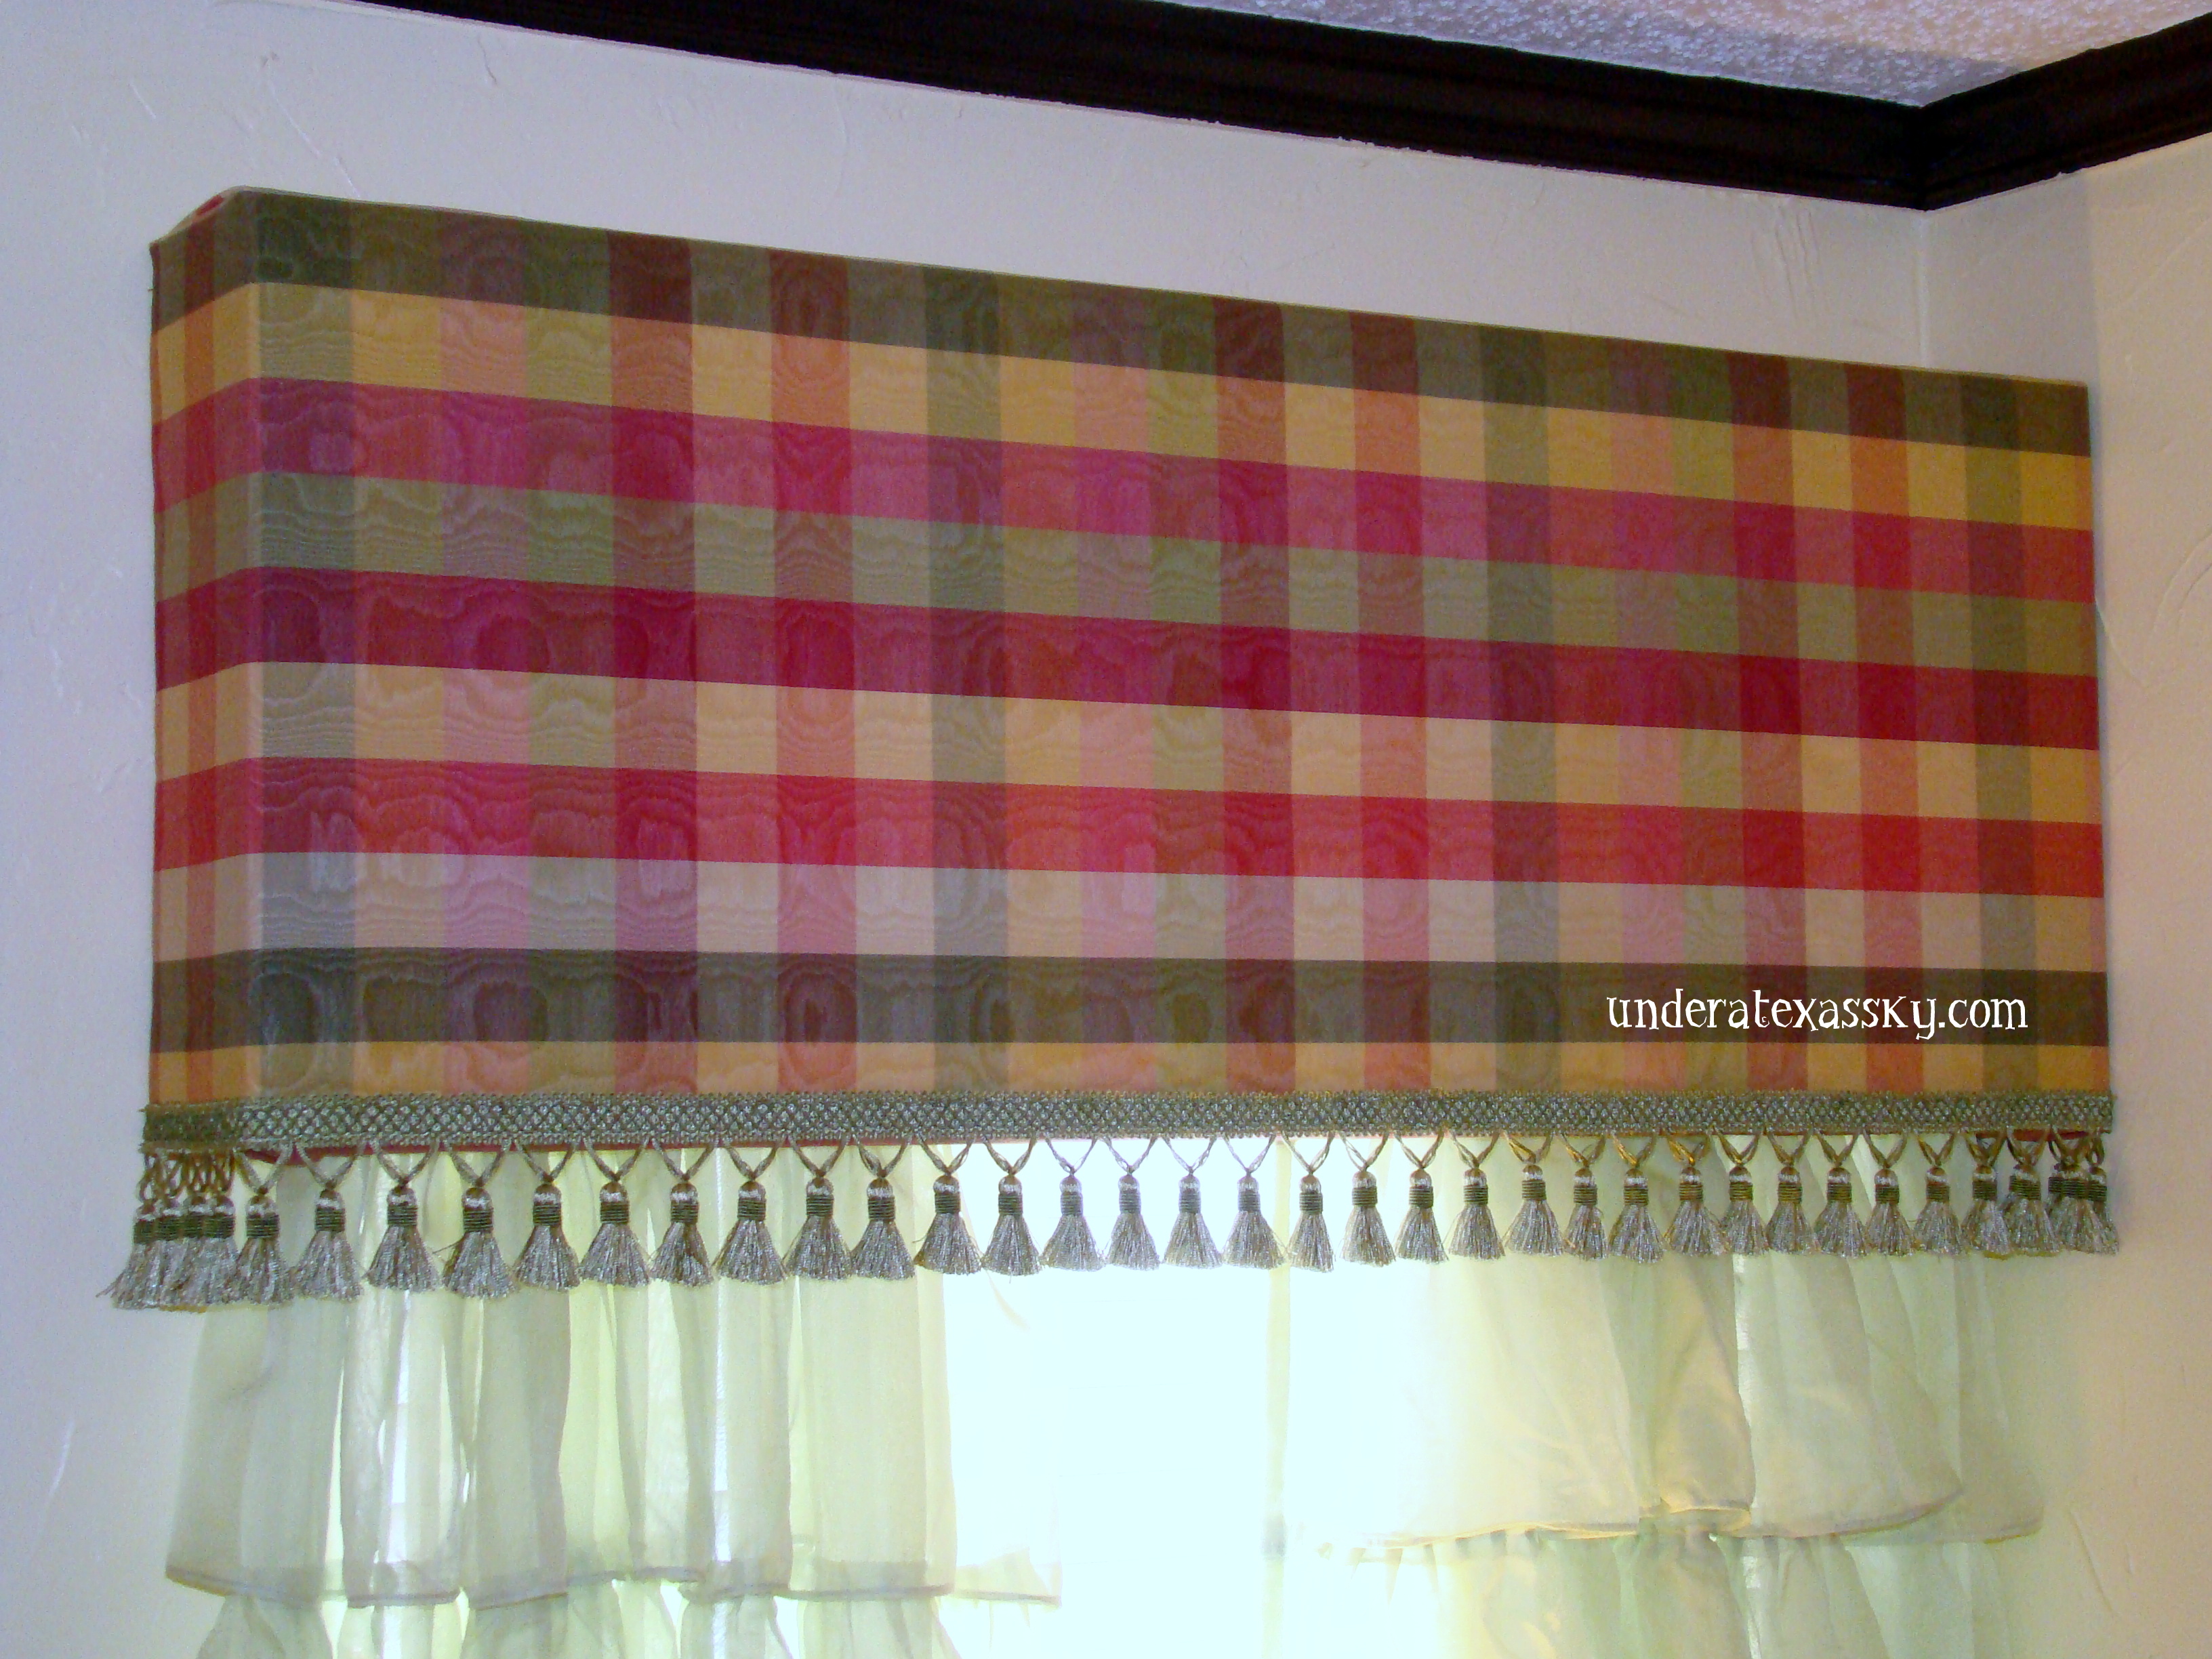
We used an electric stapler to attach the batting and the fabric to the board. We used long staples (17/32″). I purchased 1.5 yards of batting and two yards of fabric. I used home decor fabric that is 54″ wide. This was BARELY wide enough to cover the board and sides. If you’re doing a really wide window take this into consideration. You may need to buy lots more fabric to get the width. Consider how your patter runs also. For our plaid, this wouldn’t have been an issue but you may have to do some sewing if you have an upright pattern.
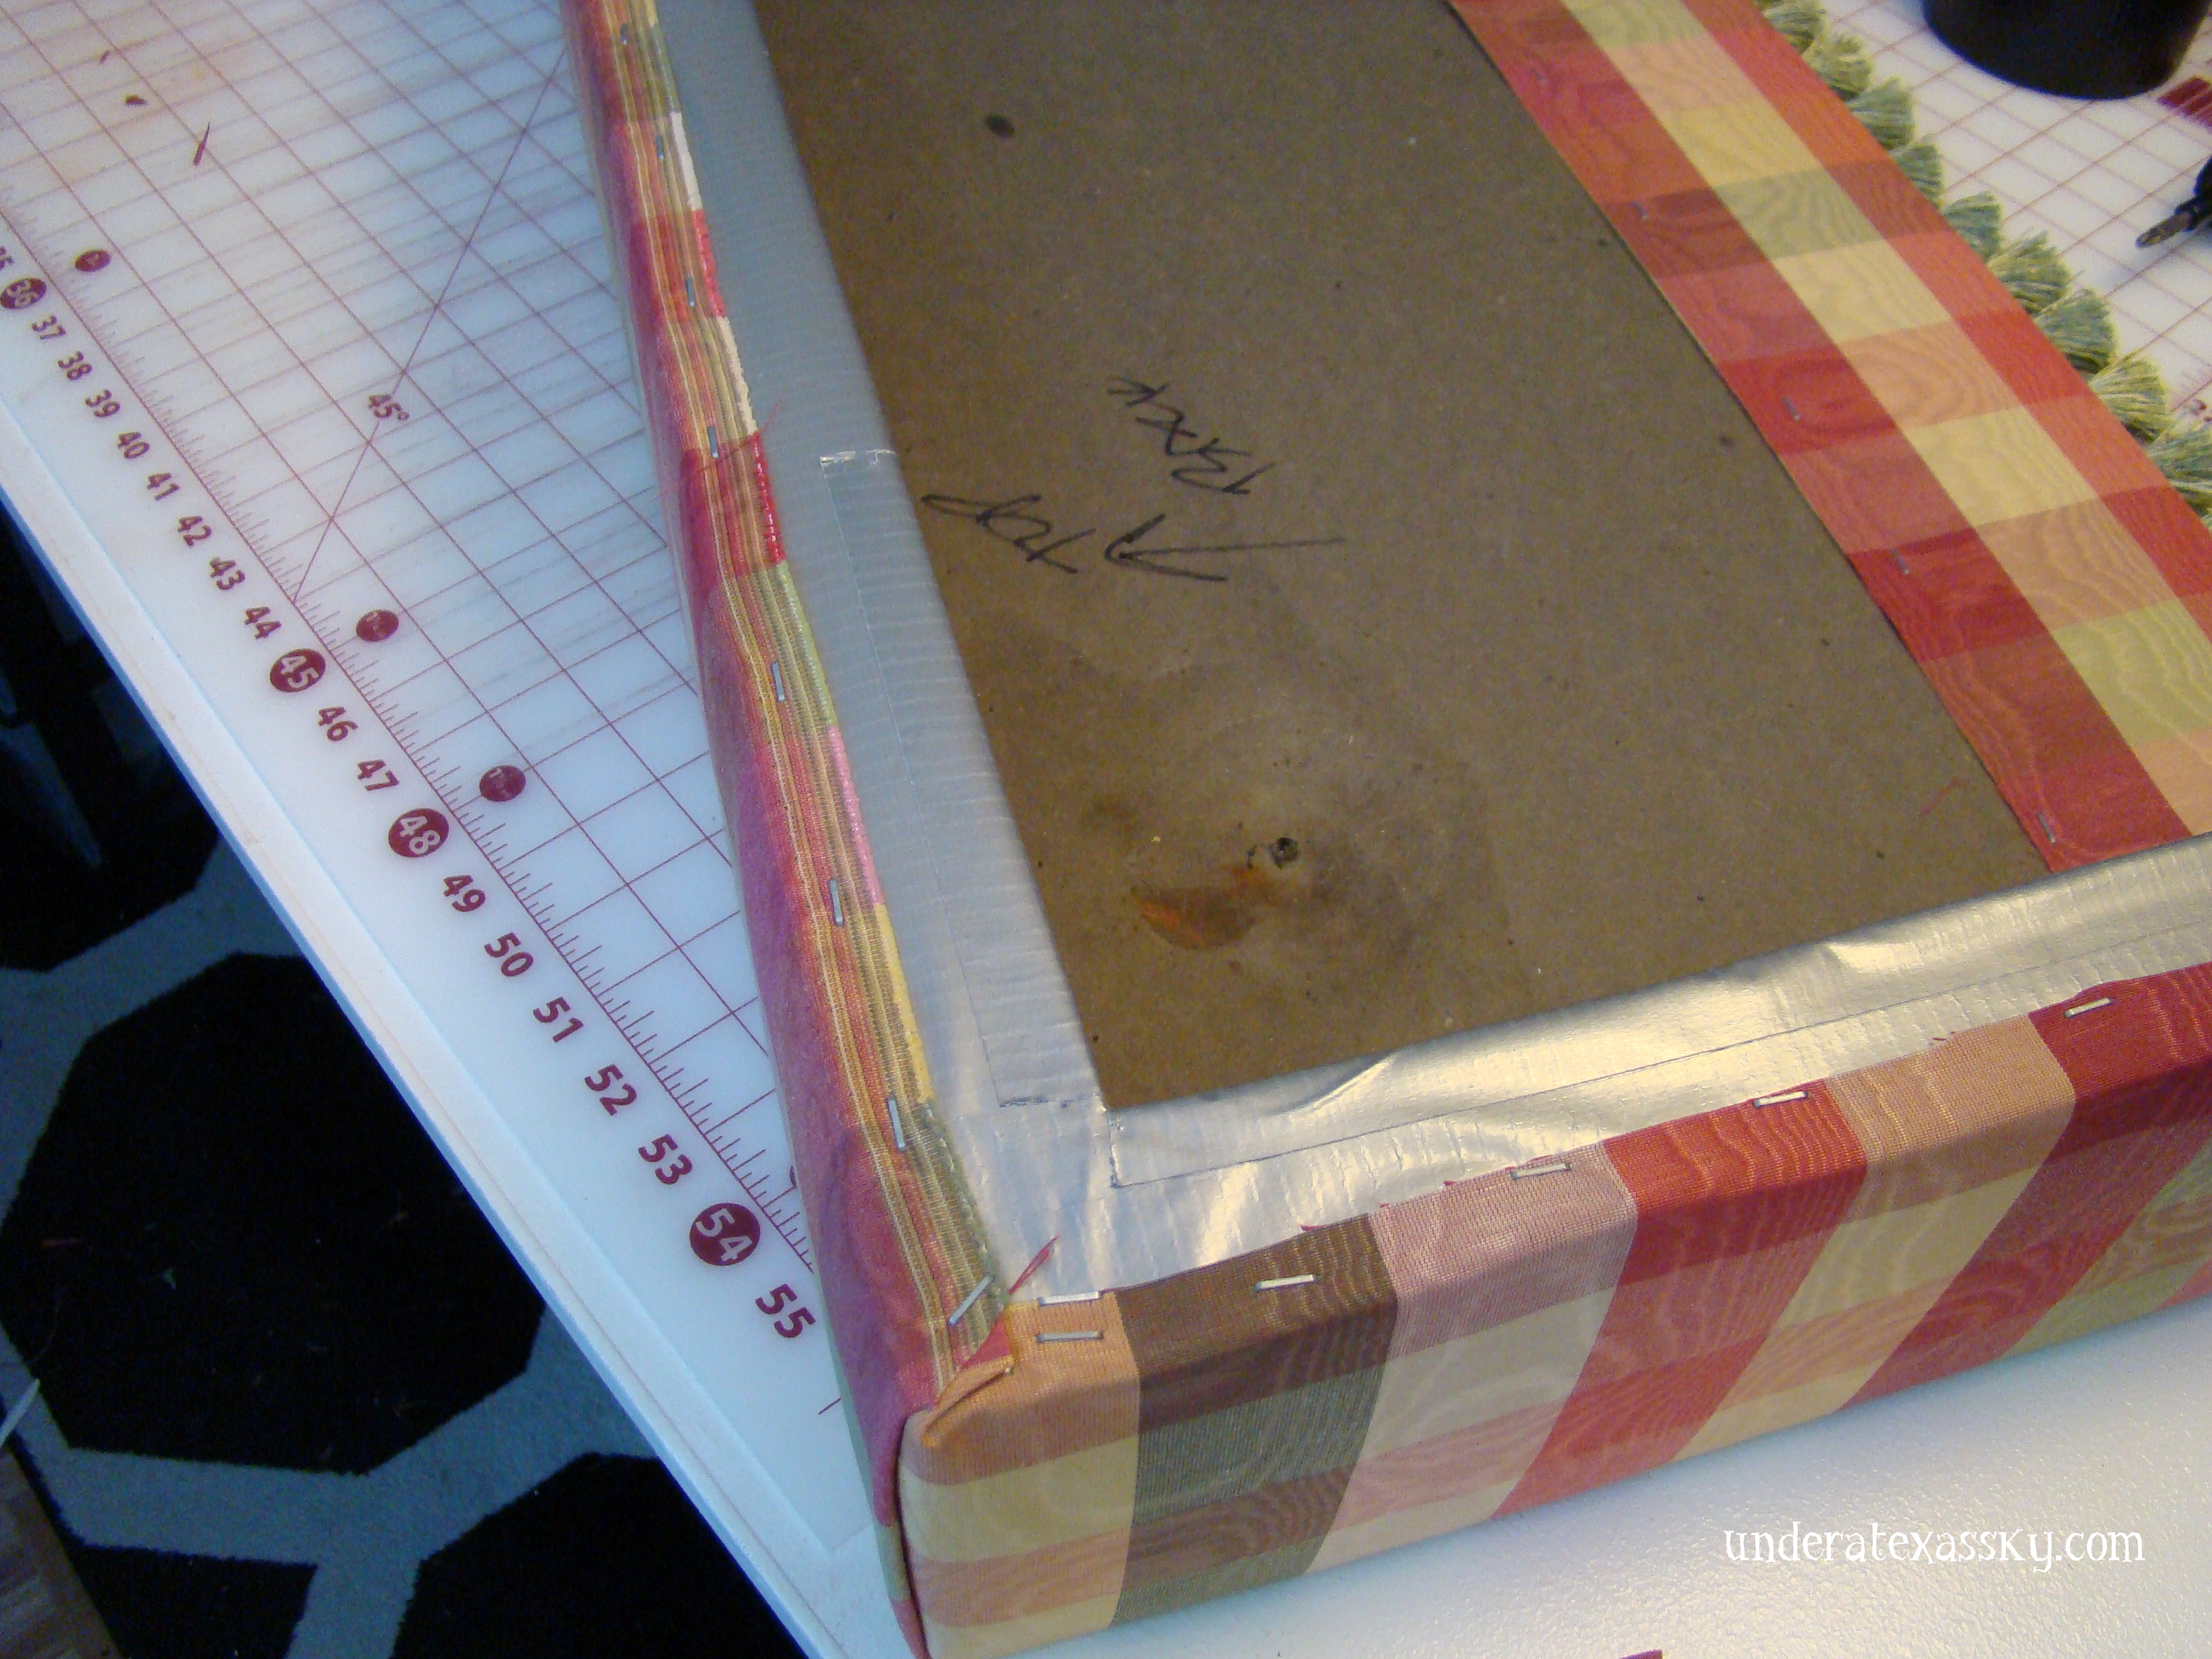
You can see we barely cleared the side pieces. Of course we finished the edges with, what else? Duct tape.
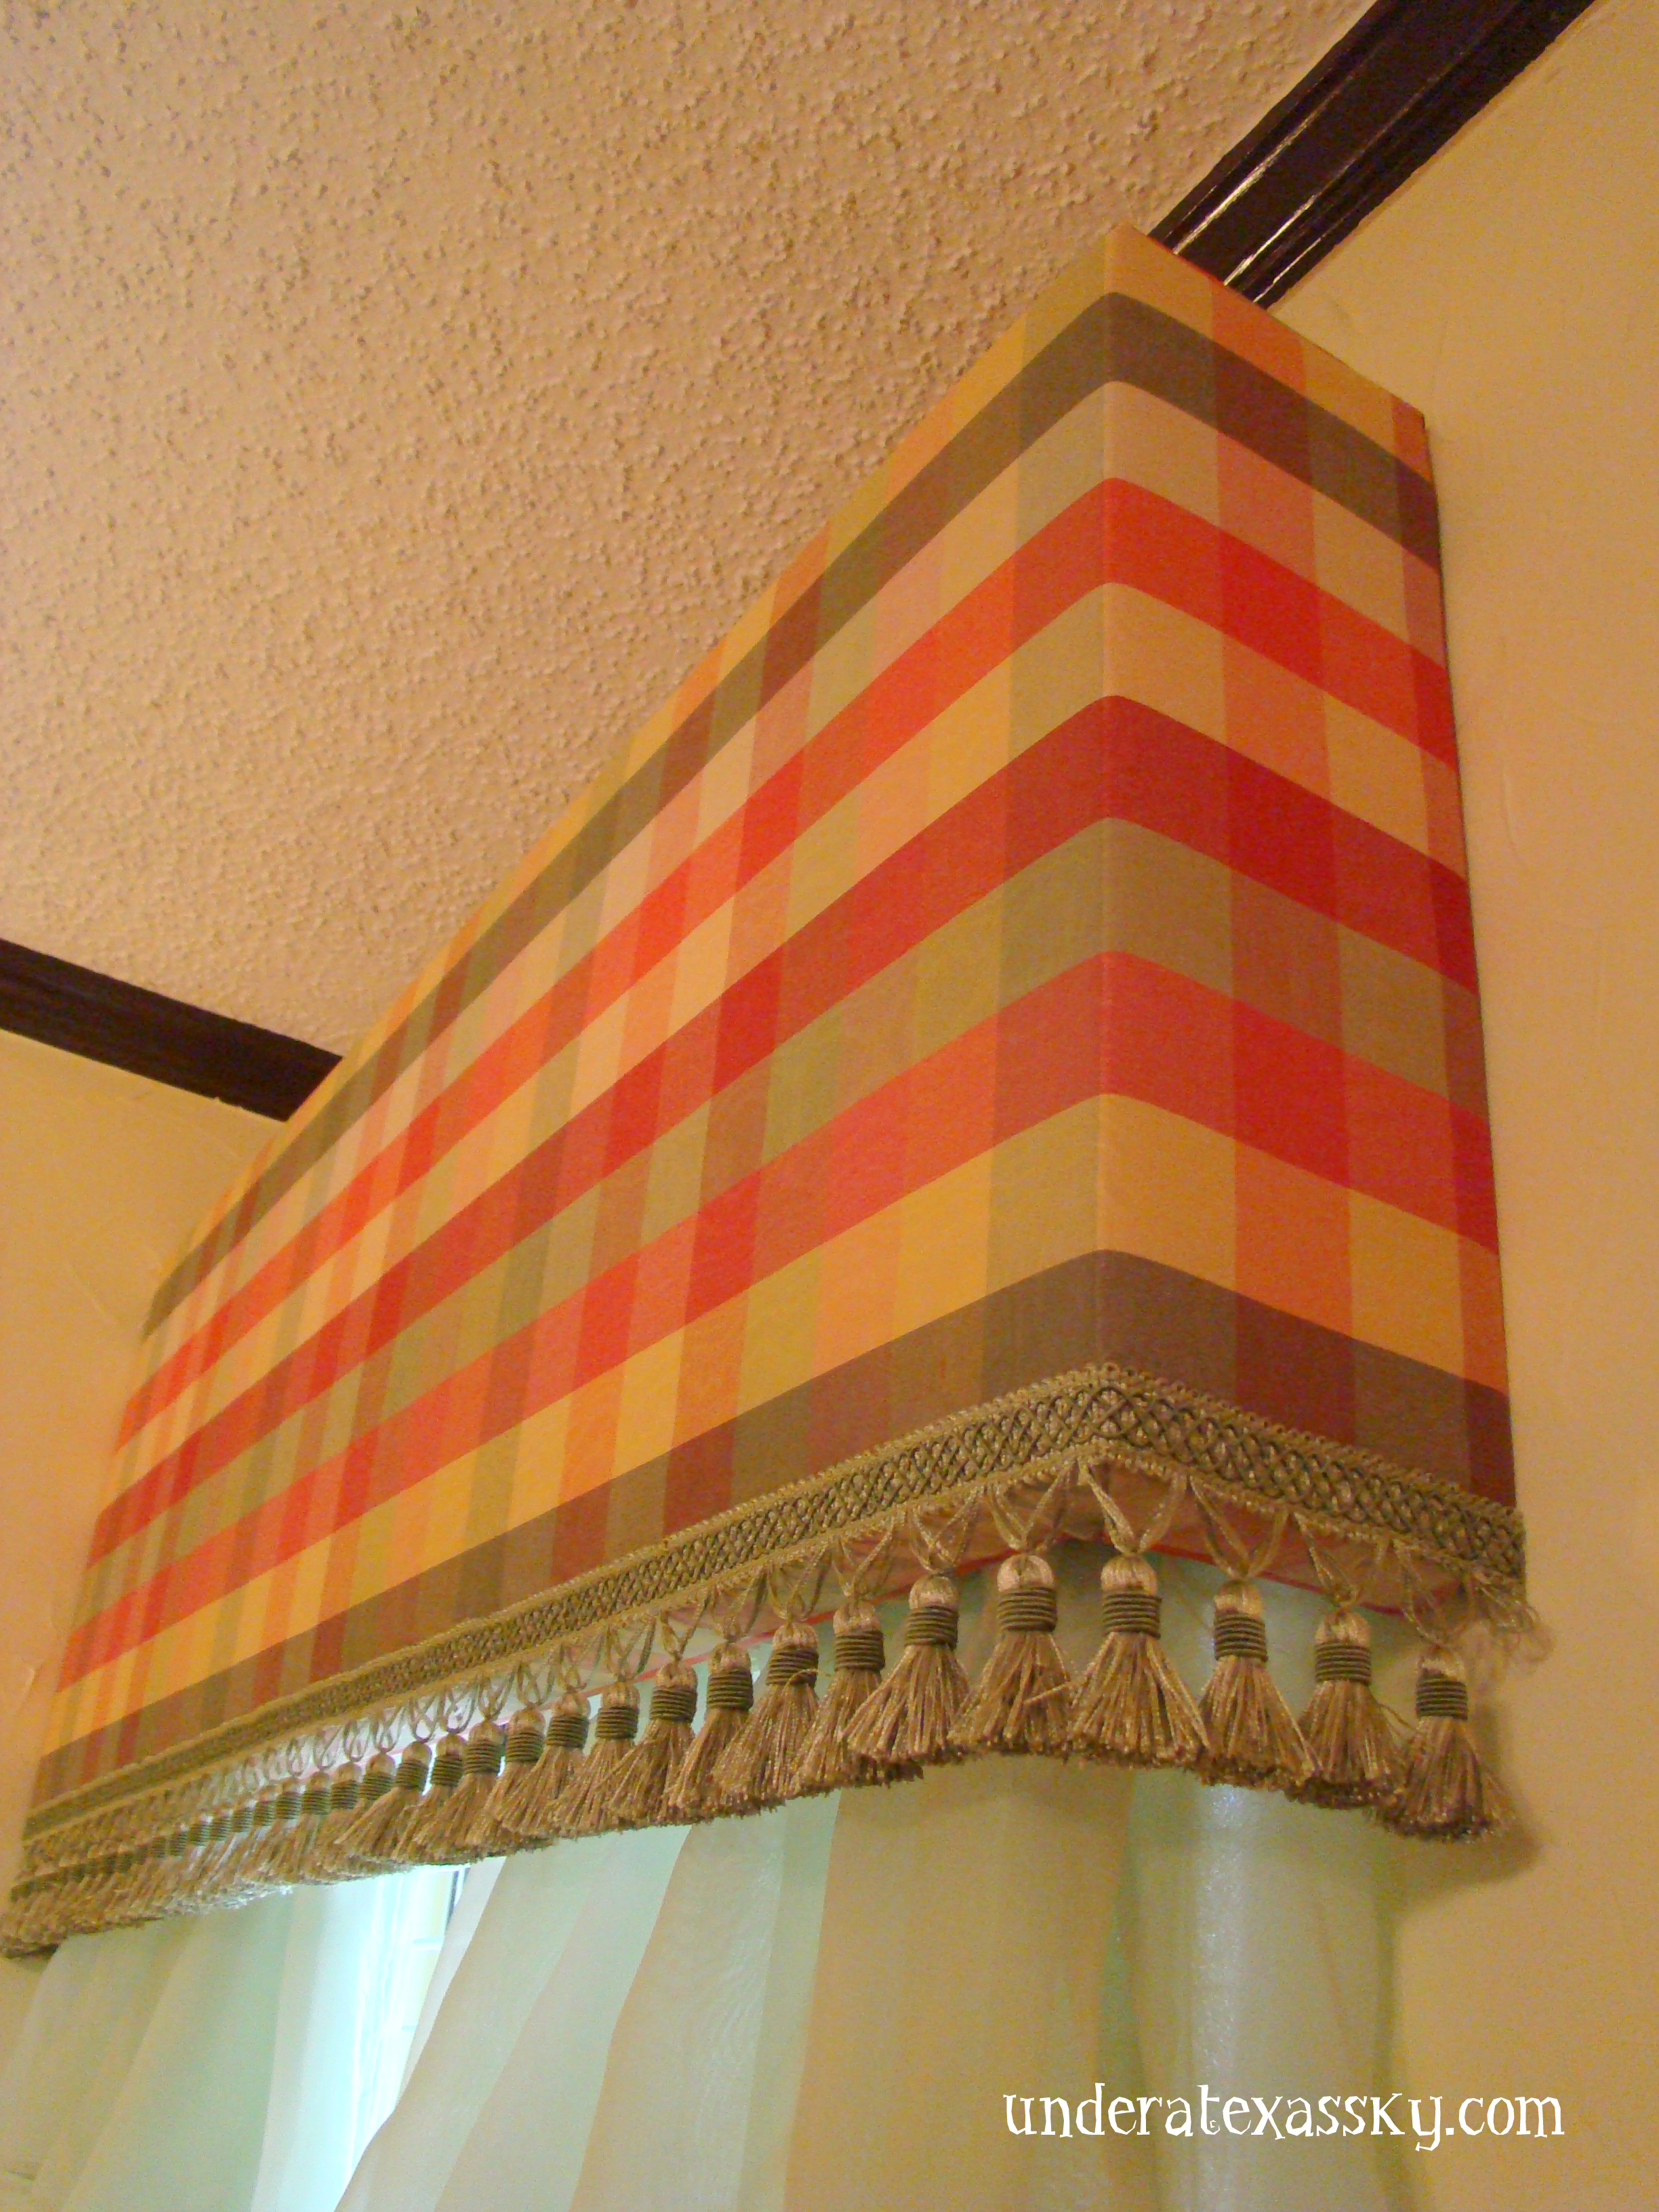
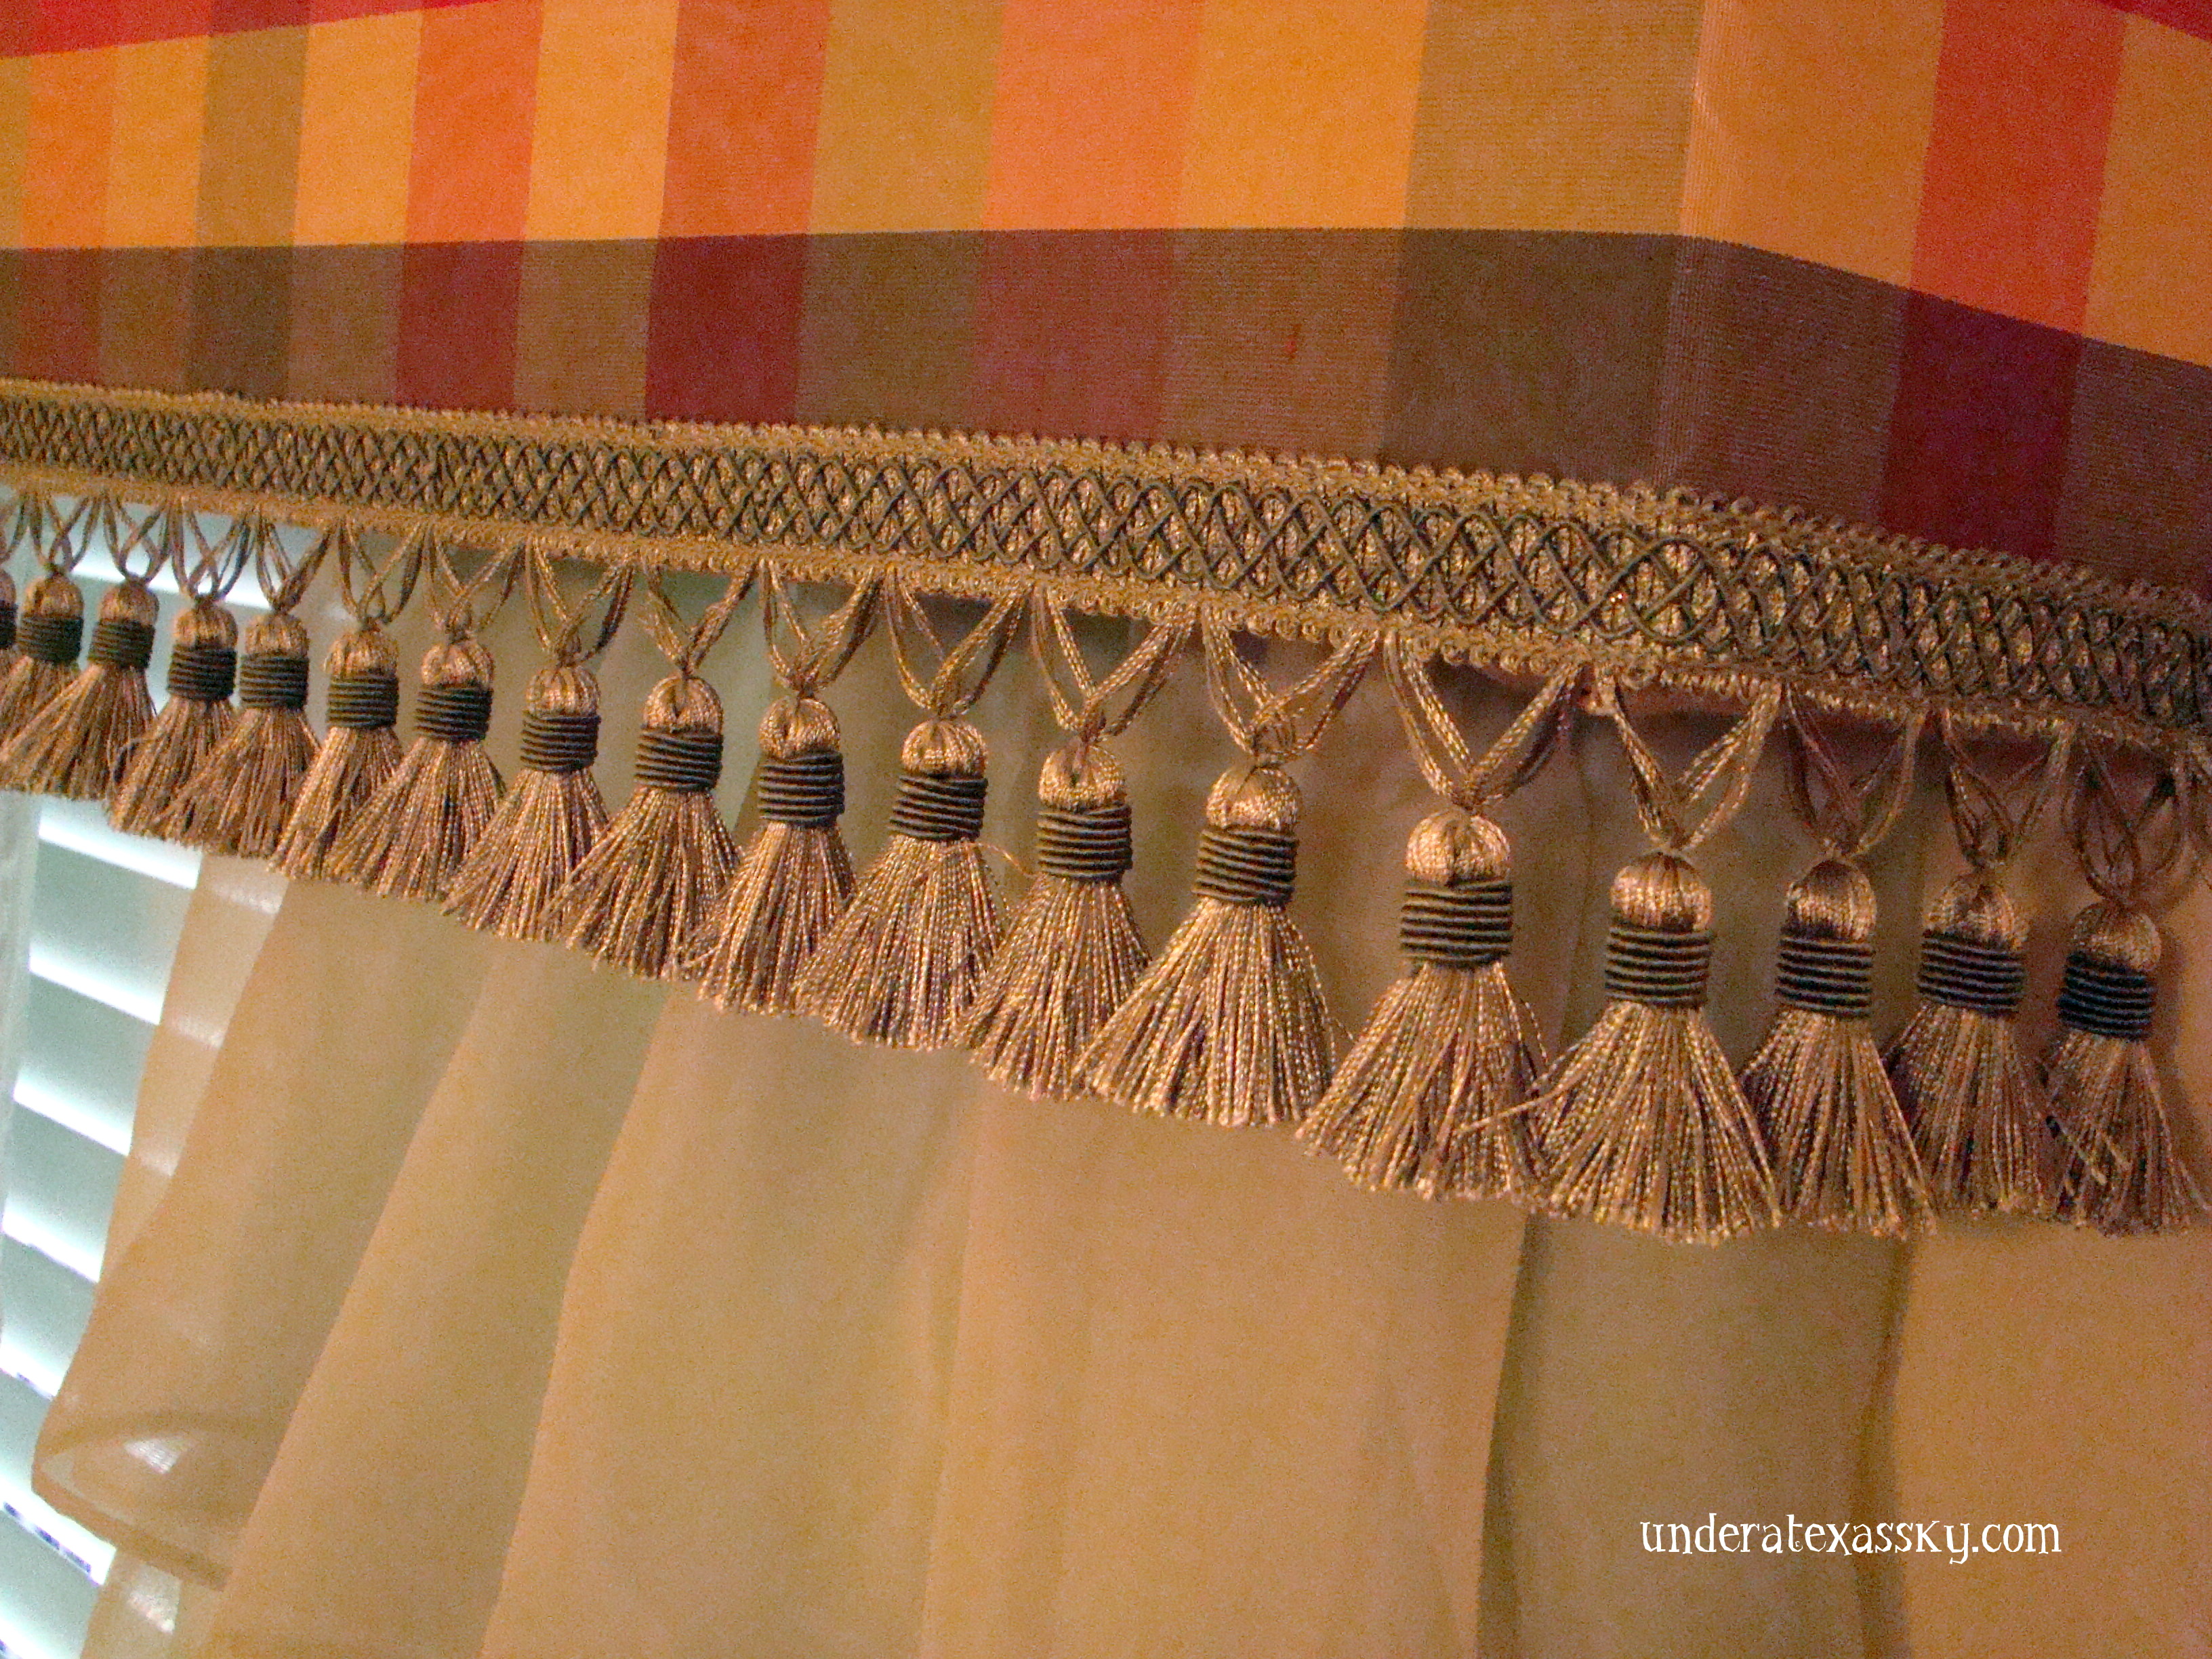
I happen to like fancy things (or as I like to say, ferncy) so I added fringe. I considered using hot glue to attach but I hate the strings that happen with hot glue, so I used small flat head straight pins. They worked GREAT- they attached the fringe and just disappeared essentially.


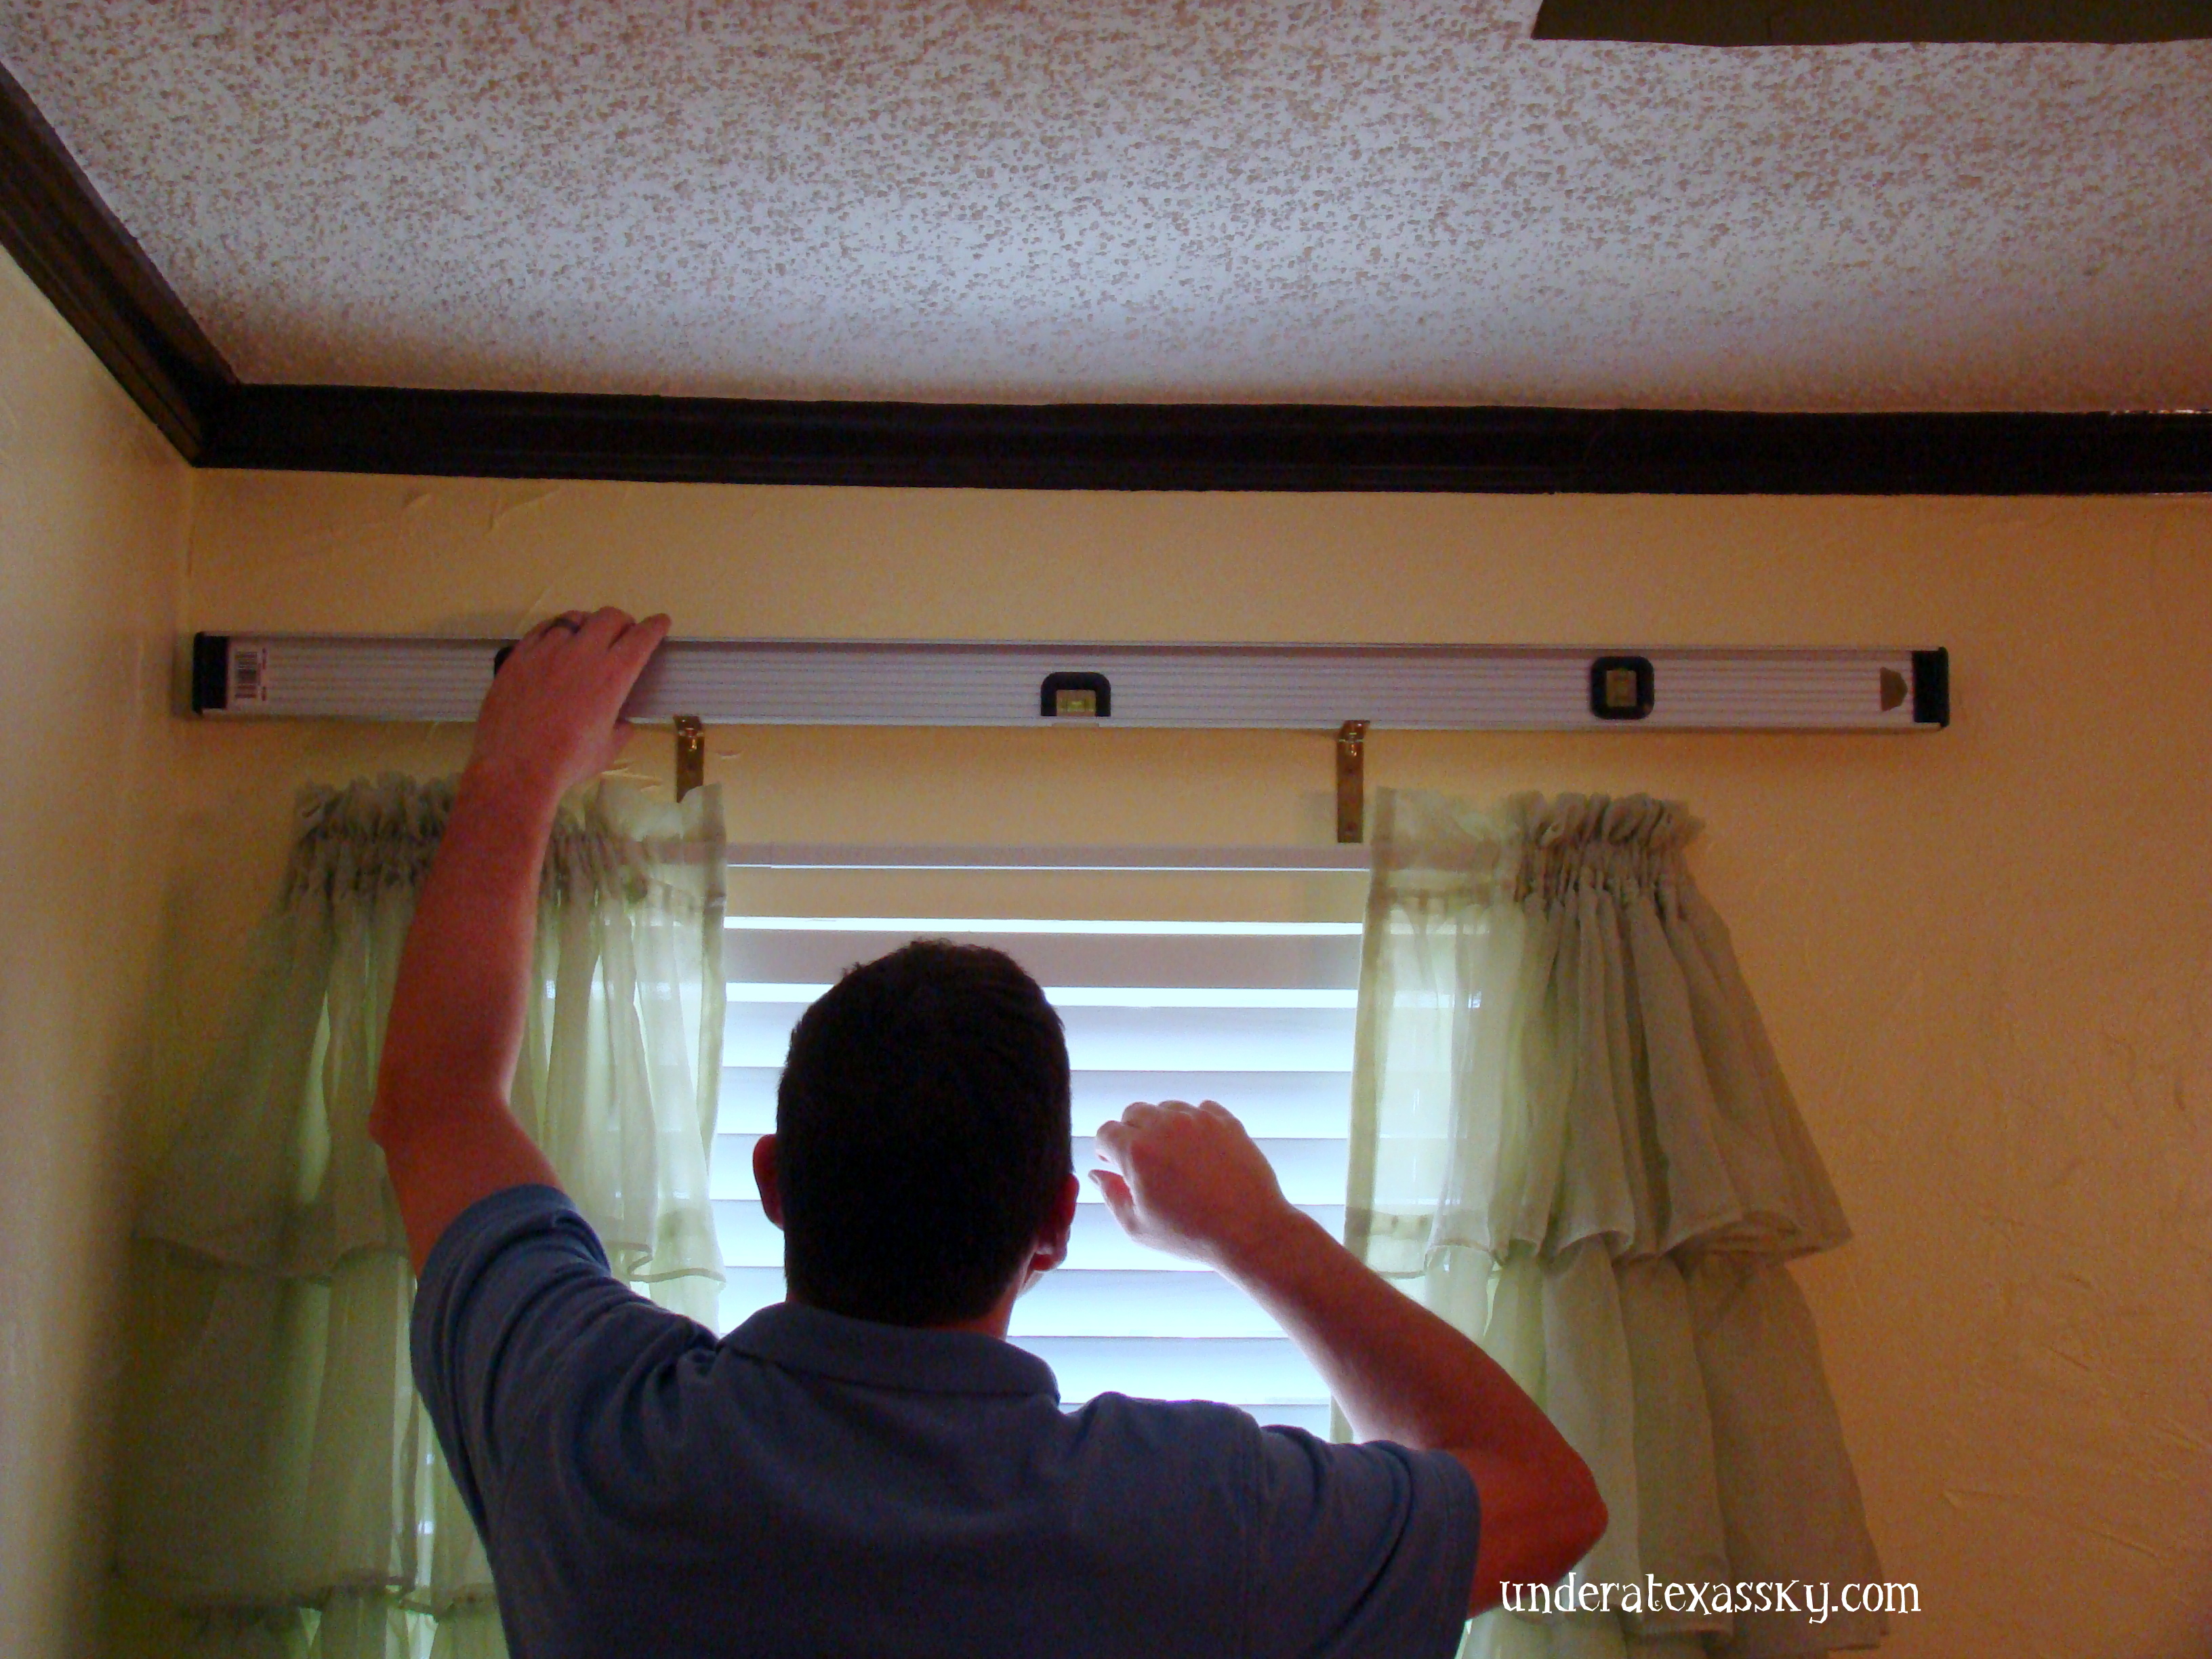
To determine exact placement of the boards we hung the curtains, then held the boards up by hand to get the height right. Marty reached under with the 3″ bracket until it abutted the cornice board header. I took the board from him and he made his marks for the first bracket. Once it was secured, he held the next bracket up and put a level on it. He then attached the second bracket.
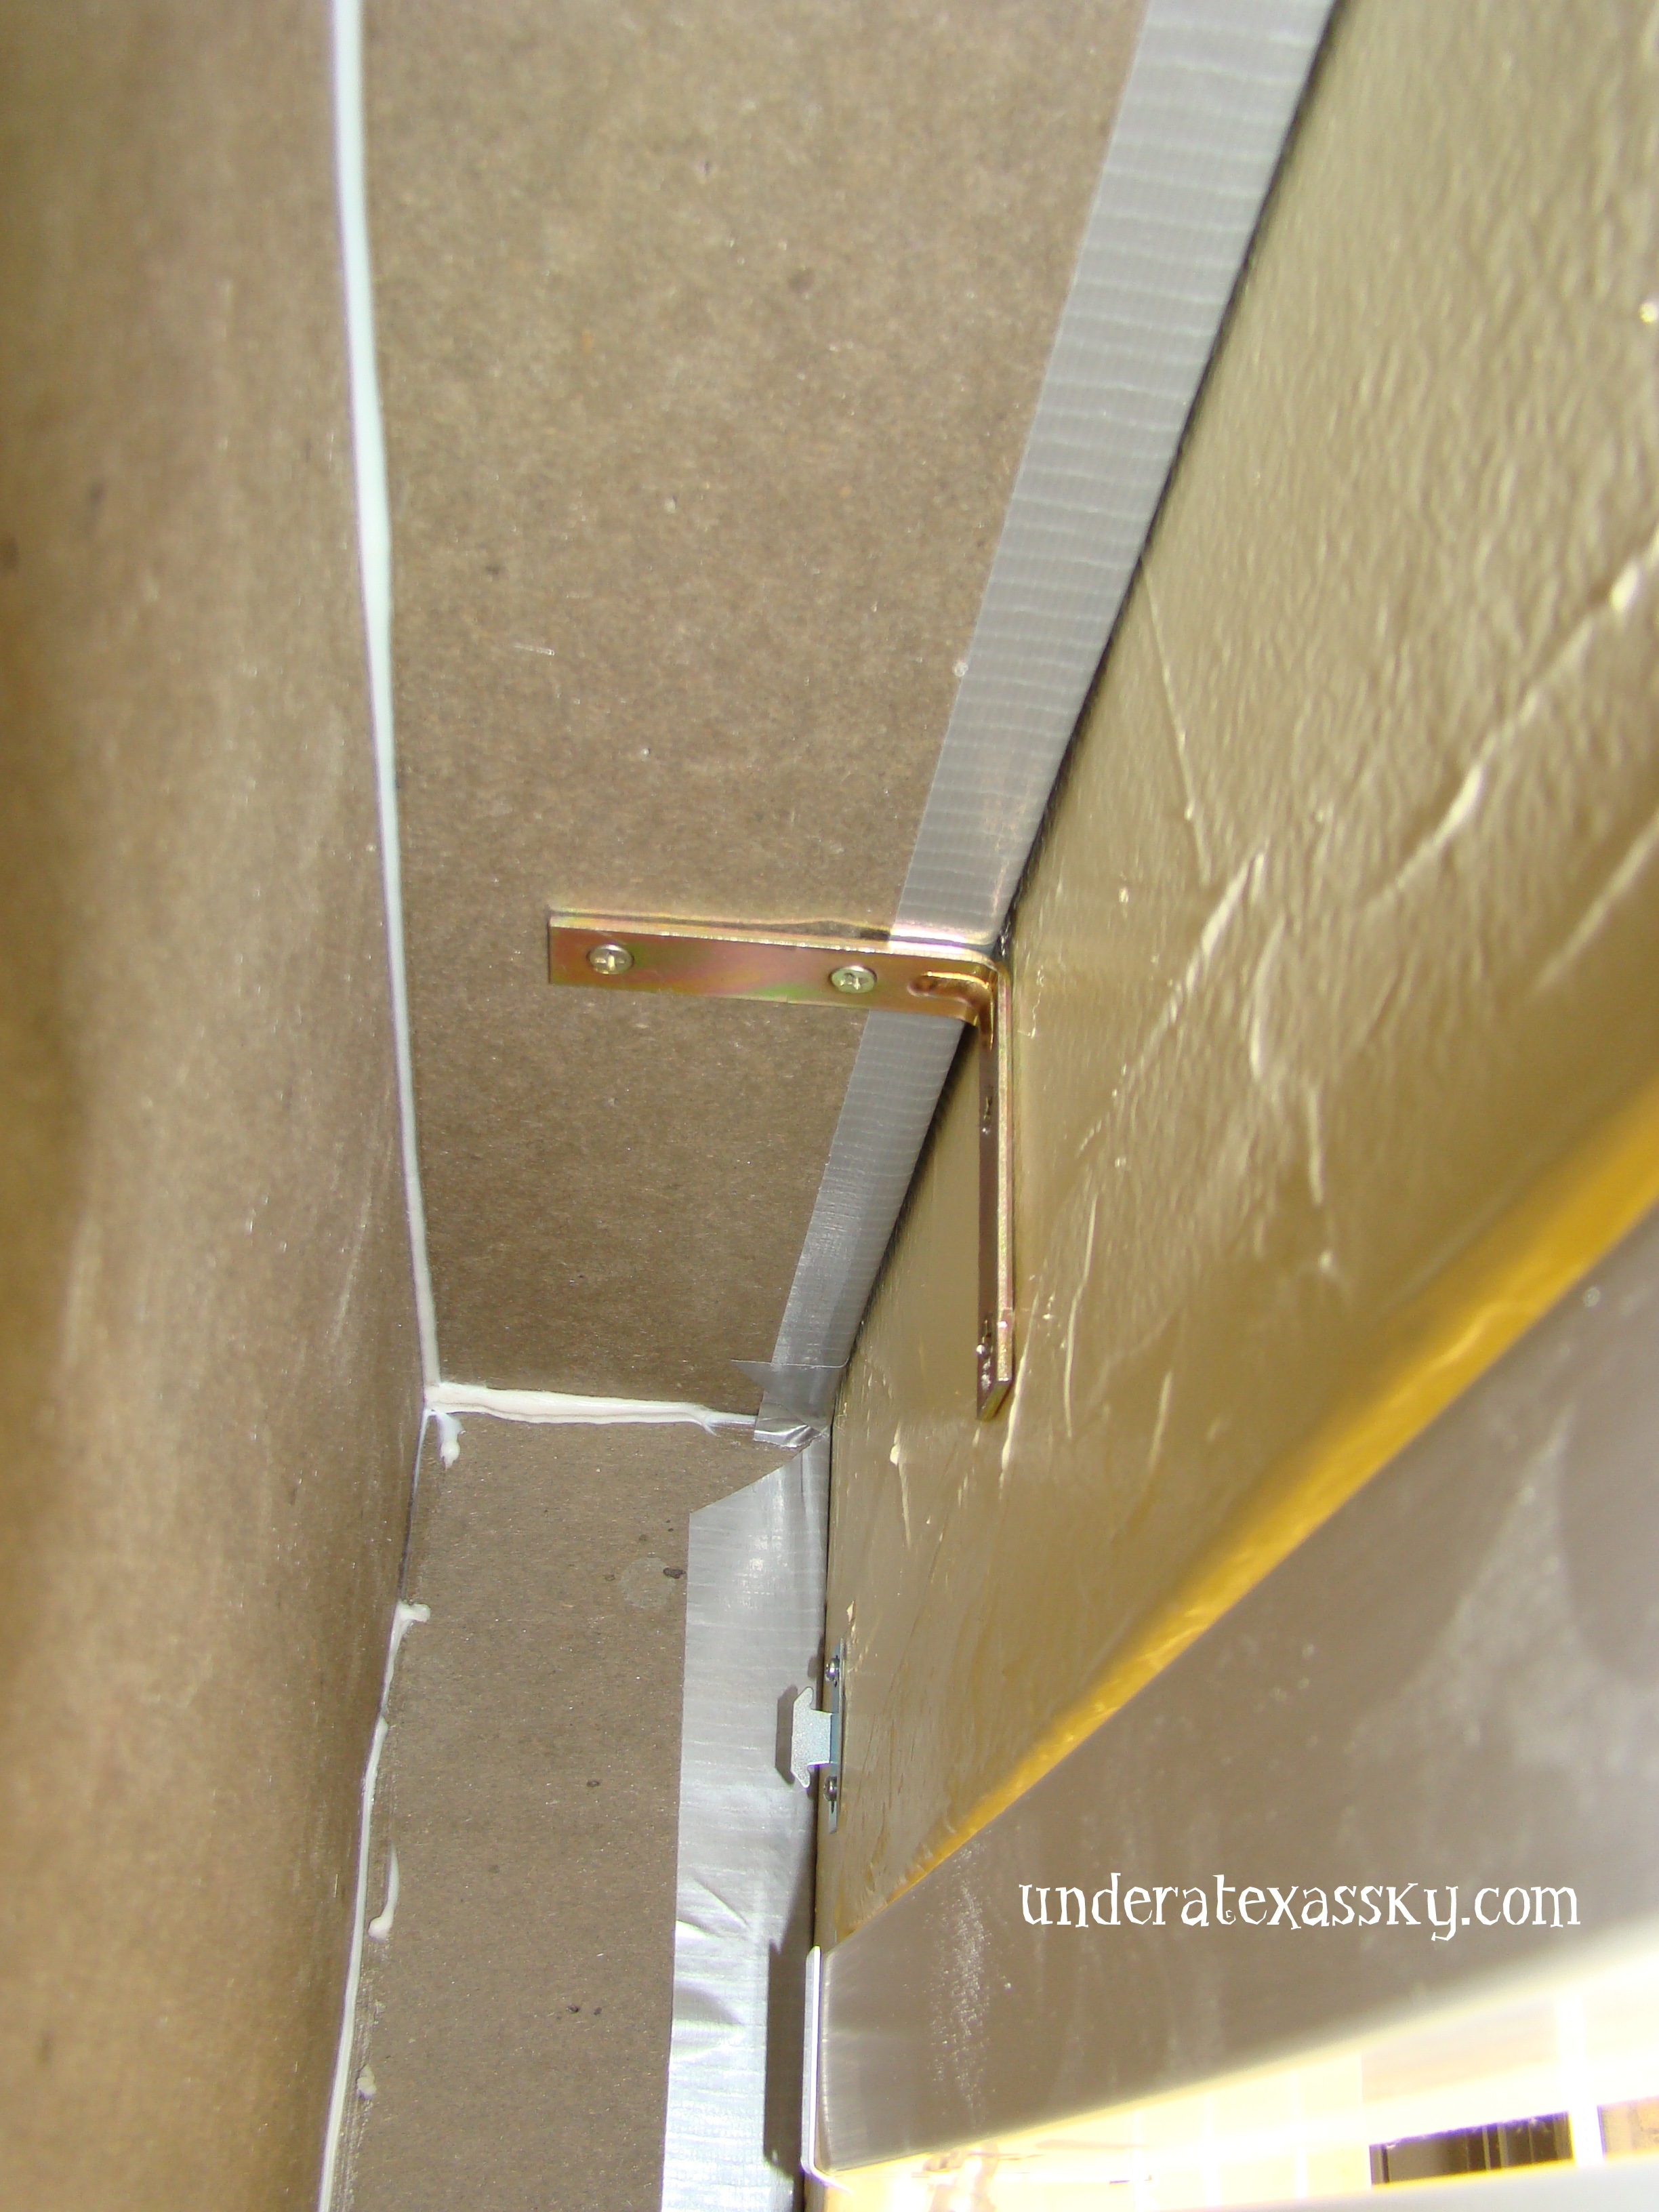
This is a view from the underside of the bracket after it was installed on the wall. The bracket is screwed to the wall and then to the cornice board header. We actually added some duct tape over the brackets just for extra support.
These boards look great and are super easy to handle because they hardly weigh anything at all. I think they look beautiful in the space. Of course, I’m a bit of a romantic.


February 9, 2020 @ 9:18 pm
Thank you for a step by step illustrated tutorial on this. Getting ready to do it for 82 inch wide window. Not sure if board comes that wide but guess it can be duct taped like the flimsier foam board is done in other sites’ demonstrations. The fact that you put a top on your cornice box will make it sturdier too. So glad I found your blog!
February 10, 2020 @ 5:08 pm
Bev- I’m so glad this was helpful and I’m happy you found me too! I hope your window treatment turns out beautifully. Blessings- Kelly
November 23, 2017 @ 7:17 am
I really love your website.. Excellent colors & theme.
Did you make this website yourself? Please reply back as I’m looking to create my own personal blog and want to learn where you got
this from or just what the theme is called. Many
thanks!
November 24, 2017 @ 3:41 pm
Jan- I have my domain name through 1&1 and use wordpress.org from my website hosting. I use the .org and not .com because my website it monetized. I got theme from Themify.me. It’s called Elemin. I hope this helps!
August 6, 2017 @ 4:49 pm
Thanks for your tutorial. I am going to try this for my kitchen window!!
August 8, 2017 @ 6:30 pm
Elisabeth- Thanks so much for stopping by! I hope your cornice board turns out beautifully.
April 30, 2017 @ 9:07 pm
Beautiful! Everything you do is just beautiful!
May 2, 2017 @ 6:19 pm
Barbara- Aww thank you so much! I’m so glad you stopped by. Blessings- Kelly
January 13, 2017 @ 7:52 pm
I love all your projects!! Your mean man reminds me of my hubby!! You two work great together!
January 13, 2017 @ 11:37 pm
Vickie- Thanks so much! It’s so great to have a partner who wants to help make my vision a reality. I love hearing there are other good men out there! Thanks for stopping by! Blessings- Kelly
August 1, 2016 @ 6:15 pm
Wow, wow. I love what you did. Beautiful job!
August 1, 2016 @ 6:53 pm
Thanks so much!
August 1, 2016 @ 12:40 pm
I have a valance to make for son’s home. I have coordinating fabrics and wanted to make Jabot with cornice or swag. This is great info using the foam board. I am not familiar with Loctite. Is there a long time to allow the glue to set-up? This info makes more possible for me since we do not have many power tools. Also, do the staples hold in foam?
August 1, 2016 @ 12:49 pm
Martha- The staples held great in the foam. We used a little electric staple gun and went to town. I did not notice any kind of fabric letting go and we pulled it nice and smooth. As far as the Loctite- we did allow it to set up overnight. I didn’t want to risk the top and side pieces coming apart. That’s also why we used the toothpicks to kind of add extra support. Honestly, the whole thing felt very secure and the best part is that they are so light. You can easily maneuver them around while you’re working with the fabric. Thanks so much for stopping by. I hope your son’s boards turn out beautifully. Blessings! -Kelly
July 31, 2016 @ 2:25 pm
Where can you buy this foam board? I have “made” several cornices using styrofoam and agree with you that it’s too flimsy!! Thanks for this ‘
July 31, 2016 @ 2:44 pm
Fortunately for me, my hubby had access to some really heavy duty packing foam. But, I think there is sturdy foam board available at the home home improvement stores in larger sheets. Thanks for stopping by! Blessings- Kelly
July 31, 2016 @ 10:19 am
Nicely done. Looks Great!
July 31, 2016 @ 2:44 pm
Thank you so much!
July 31, 2016 @ 7:05 am
Lovely! It sets off an already beautiful room!
July 31, 2016 @ 2:45 pm
Thanks so much! Blessings!