An Oval Ruffle Wreath for Christmas
It’s hard to believe that it’s time to start thinking about Christmas decor. You gotta get a head start on your holiday decor before the stores are sold out of the good stuff. I found an oval wreath form with dark green twists and knew it’s be perfect for a ruffle wreath for Christmas. It’s funny because I’d had this wreath for some time and hadn’t used it. Then I got a message from a dear friend wondering how she didn’t have a Christmas wreath from me. I was surprised because this girl has lots of seasonal wreaths that I’ve made. So I told her, no worries, I’d whip one up for her. Here’s what I came up with.

Materials
1 oval work wreath (mine is 15×24 basically)
2 rolls 10″ poly burlap mesh (I used a striped roll and a red roll)
2 rolls 10″ premium poly deco mesh (I used a Christmas striped and gold rolls)
ribbon- various widths and colors (I used 5 kinds: 2 1/2″ rolls or stripes, plaids, and snowflake burlap)
Christmas ornaments, picks, embellishments
That’s basically the list of supplies. I got my wreath form and all of my mesh and ribbons from craftoutlet.com. They have a nice selection of everything you need. I’d not get my embellishments there, however. You can do better at the local craft stores since they put everything on sale for 40-50% off.
The Process
This is just a simple ruffle wreath. I’ve shown you several of these. The only difference here, is that I put three ruffles in each twist. So your prep time will be a bit long. As always I cut my mesh a couple of rolls at a time. Place your mesh rolls one on top of the other. Using your rotary cutter (this is a must buy), cut your 10″ mesh rolls into 12″ lengths. I went with 12″ instead of 10″ since this is a big wreath and I wanted good coverage.

These wreath forms have a LOT of twists. 28 in all, I believe. You’ll need to cut 28 ruffles in each color of mesh. That’s why doubling up is so important; fewer cuts.

Once all of your cuts are made, it’s time to start layering them into the wreath twists. The ruffles are easy to make. Start with a cut piece of mesh, lay it flat on your surface (finished ends to the sides). Using your thumbs and index fingers, just gather the piece up in the middle.


Use both hands here, I’m just showing one because the camera was in my other.

Take your ruffle and place it between the first twist. It doesn’t matter where you start. I usually start on the outside, but do whichever you like. Twist the ruffle in with about one and a half twists. Don’t twist it all the way in tight as you’ll open the twist for the next ruffle.

Take your next piece of mesh and make the ruffle. Place it in the twist next to the one you just placed.

Continue doing this all around the wreath, alternating the ruffles so there are no two alike next to each other. After the entire wreath has one ruffle in each twist, do the whole thing again. Open a twist and add a ruffle on top of the existing ruffle. Again, alternate the colors so no two are next to each other.


Here’s how it will look with two ruffles in each twist.

It’s pretty but not near full enough. Go ahead and layer in one more round of ruffles in each twist. Alternate the colors as you have been. You don’t want a concentration of any one color in any one spot. You can see below how much fuller the wreath is with three ruffles in each twist. Just beautiful.

Add Ribbons
Now it’s time to really start to jazz up the wreath. Cut your ribbons to about 13″ long. How many ribbons you cut is up to you. I usually have one roll that I put in every twist. So that’s 28 cuts at 13″ long. This is why you need to buy your ribbon from a place that sells in yards not feet. This is a lot of ribbon. Once you cut them to length, you’ll want to chevron the ends for a completed look.
To do this take your ribbon and fold it in half in the lengthwise.

Cut from the folded side diagonally down to the open side.

And voila!

You can cut both ends at the same time if you’ll fold your ribbon in the middle first. Then fold lengthwise and cut as shown.
After you have all your ribbons cut. As I said, how many is up to you. Since this is a big wreath, I cut tons. I started with the first color and put one in every twist. I opened the twist and pinched the ribbon in the center and twisted it in. Here’s a pic from another wreath showing how the ribbons layer in.

Continue around the wreath layering in the ribbons, one on top of the other. Be sure to open up the twist before placing the ribbons. You’ll run out of room if your don’t. Plus the ribbons don’t look as tight if your don’t.
Add Ornaments
Next add your ornaments. I usually put my wreath upright on a wreath hanger before I start adding embellishments. This way I can see how balanced everything is. For picks, I pull them through the wreath form and use a zip tie to secure.


Tighten the zip tie around the pick stem. You can cut the stem to shorten it and wrap it around the form to remove the sharp edge. Cut your zip tie to clean it up.
Floral wire is also a great way to secure elements. For this little twig bell, I simply wrapped the floral wire around the edge and then secured it to one of the twists.


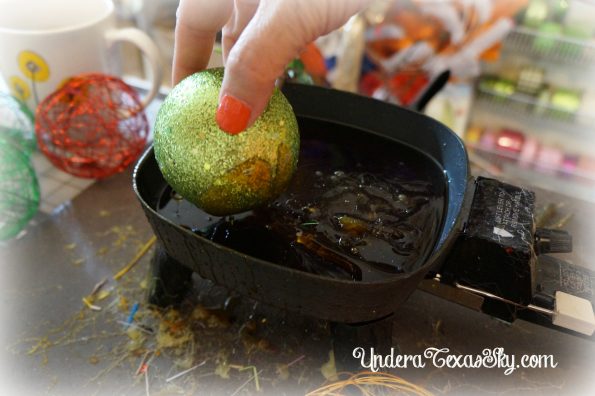
Hot glue is great for adhering traditional ornaments. Here are a couple of pics from another wreath showing how easy it is using a glue skillet.

Finished Product
Using a mix of poly burlap and metallic deco mesh made a beautiful wreath. Glittery ornaments with rustic elements created an interesting and festive look. Needless to say, my friend fell in love with her wreath. It was perfect for her front door!


August 21, 2018 @ 4:07 pm
As always I enjoy seeing you making different wreaths than I have seen before. And your explanation of how your steps and where you get your materials. Your an awesome, talented lady.
Thank you for letting us join you! 🙂
August 22, 2018 @ 9:17 am
Patty- Thank you so very much for such a lovely compliment. I’m happy to hear my tutorials are helpful to you and that you enjoy them. I know busy life is, and you taking a moment to give such nice encouragement means so much. Blessings! -Kelly