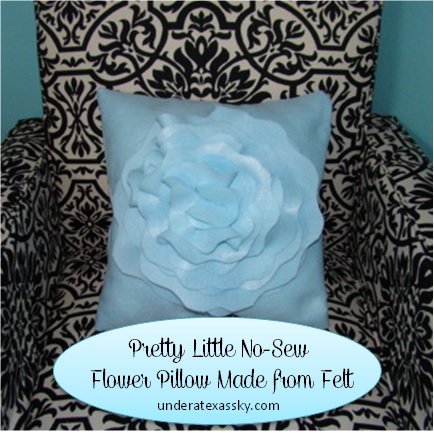
I’m a sucker for anything with a ruffle or a flower and so all those cute pillows with them that are everywhere these days make me happy. Now, this project was done back before I got my sewing machine (and before I learned that sometimes a project that requires sewing isn’t so hard) but- I wanted to do something less taxing so here’s how I did it. Oh yeah, now, I made this pillow out of felt- it’s acrylic felt so I understand that it is basically temporary- but if it’s just used for decorative purposes I can likely get several months enjoyment out of it so it’s totally worth the $3 investment!
Materials:
1 yard of felt (there’s leftover felt)
Scissors
Ruler
Straight pens
Fusing tape
Hot glue
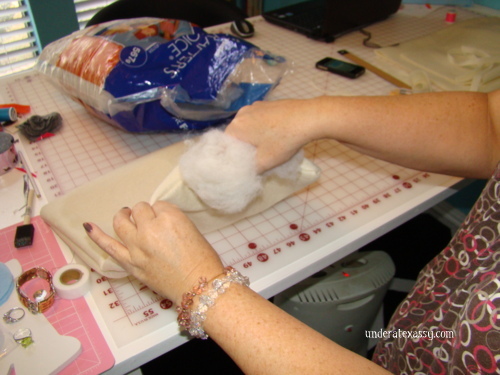
Poly stuffing
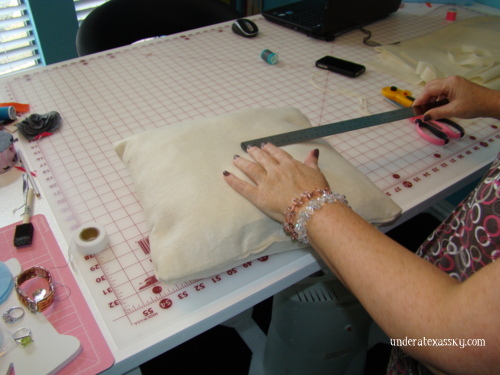
1.) Try to square up your fabric. I made my two squares 16″x16″

2.) Pin the two pieces together, leaving enough room to insert the fusing tape. I fused all sides together leaving enough room to turn the pillow right-side-out and to stuff it.

3.) Stuff the pillow. I’ve seen some sites where they assemble the flower and attach it before this step. I found it easier to create that flower last – but do whatever works best for you. I fused the opening after stuffing.
4) Measure to see how big you want the flower (at it’s widest part). I went with 6″ round.
5.) Draw your first circle by laying out a large square of felt and using a 6″ length of string attached to a pen and the other end to a straight pin. Place the straight pin as near the center as possible and pull the string taut and circled the felt with the pen. Use that circle as a template to make gradually smaller and smaller circles. I laid them out on the pillow to be sure the size was good. I used 8 circles.

6.) Take each circle, fold it, and scallop the edges.

7.) Stack up all of the scalloped circles to be sure they looked randomly uniform (yeah, that’s a thing).
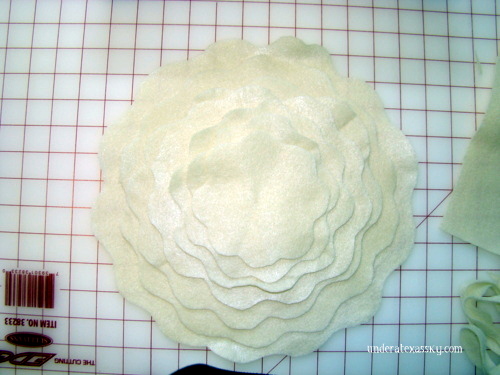
8.) Take each circle and added a dab of hot glue to the centers and sort scrunched them – this gave the fullness for each circle. Then just stack the scrunched up and scalloped circles hot gluing one on top of the other after attaching the biggest to the pillow first. I added dabs of hot glue randomly to be sure all of the sections would stay attached. I did the double foldy thing on the last circle. I folded it once, then again. I folded and glued the pointy part to the back of itself so I had a flat surface to glue to the top of the flower. Here it is!

This would be a great project to do with the kids- just supervise during the hot glue portion!
May 31, 2016 @ 4:30 pm
What a sweet little project that while possibly short lived has obviously given you great joy. Thanks for sharing with us at Creatively Crafty 🙂
May 31, 2016 @ 6:00 pm
It’s a fun little project for sure! Thanks for the opportunity to share. Blessings to y’all!
May 25, 2016 @ 9:20 pm
This pillow is so adorable, Kelly! And what an easy project for a rainy day. I’m so happy you shared it with Inspiration Thursday! Have a fantastic week.
May 26, 2016 @ 7:56 am
Thanks so much! I just love this little project too- easy and cute is a great combination. And it seriously makes the perfect accent pillow. Thanks again- it’s a blessing to have a place to share ideas. Have a lovely holiday weekend!