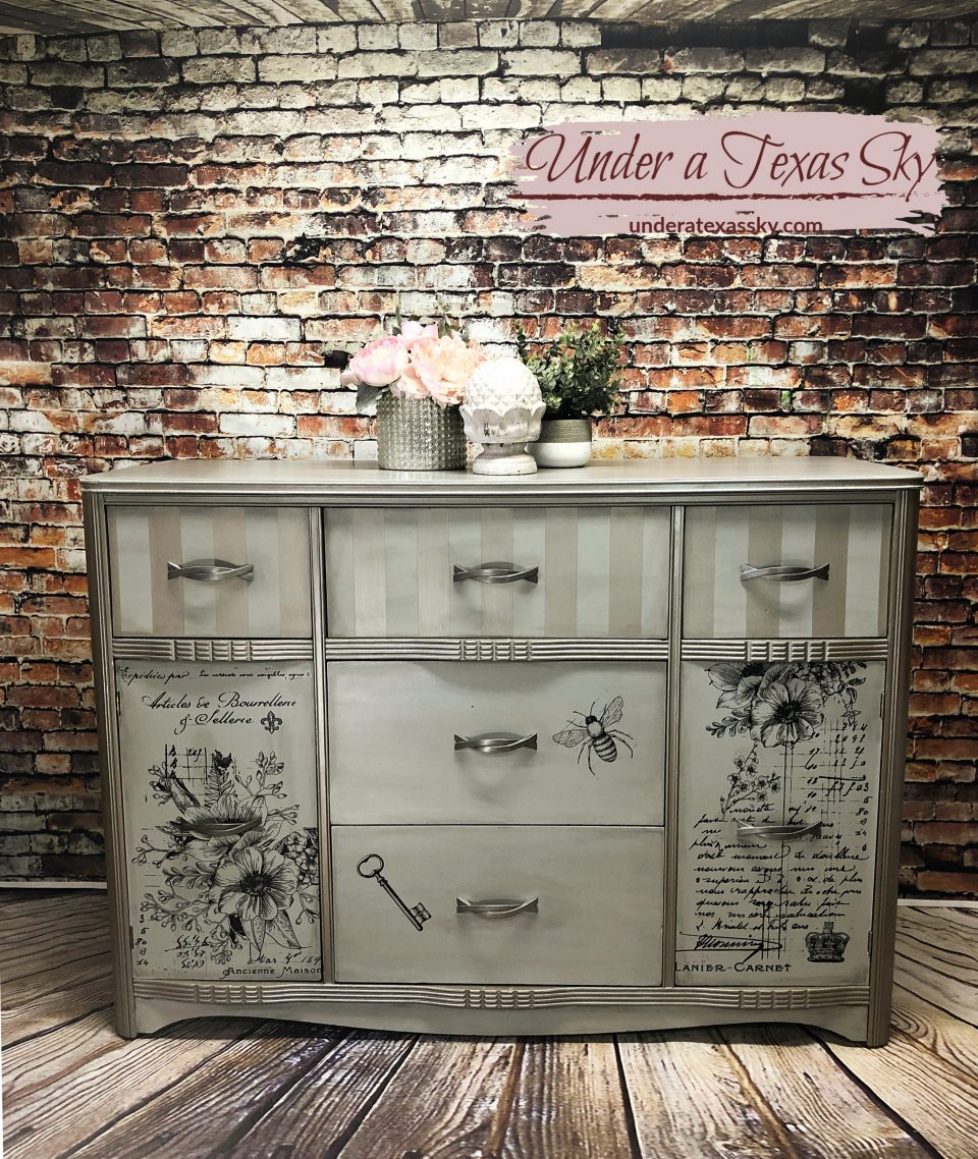
I had a customer who asked if I could refinish a cabinet that’d belonged to her grandmother. She wanted it repaired and reworked so her four-year-old daughter could use it as a dresser. Pinks and traditional little girl themes were out; she wanted it to be able to grow with her daughter. It needed a vintage furniture rescue!
Now this piece was rough. It was probably made in the 1930s. There was lots of veneer damage, wonky drawers, and doors that just didn’t want to close smoothly any longer.
First Things First
Normally when you you are refinishing a piece of furniture, you clean, clean, clean. In this case there were repairs galore. Always do your repairs before you clean your piece. There’s generally sanding and such to do first and there’s no point in cleaning, then cleaning again.
In the case of this beauty, there was so much veneer repair to do. I use Dixie Belle Mud for these repairs. For me, it’s much easier to use than traditional wood filler. It’s just easier. I did a Facebook live on how to do it.
Be sure to seal the repairs with some Dixie Belle Boss before you paint.
Now Clean It
After all your repairs are done, clean your piece with a really good cleaner. Dixie Belle’s White Lightning is fabulous for this. It’s a powder you mix into a spray bottle. After spraying and wiping down, follow with some water to rinse. This will remove all grime, grease, and other residue that is likely on your piece. It’s vital to start with a clean surface. Prep is everything.
NOW It’s Time to Paint
We sprayed on two coats of Dixie Belle Driftwood using a HPLV spray gun. I picked mine up from Harbor Freight. On big pieces, this makes things so easy. Remember to remove the hardware first! I actually hand painted the hardware in the Steel Magnolia and added some Sterling Silver Gilding Wax to them.
Stripes
I’d seen some dressers with striped drawers and loved them so I thought I’d try to add some stripes to the top row of drawers. This is a tedious process, but it’s not difficult, don’t be intimidated. I used the yellow Frog Tape and simply found the center of dresser. That was the starting point for my first strip of tape. Then simple add more strips by butting them up next to each other. The entire row of drawers will be covered in tape strips. Then simply begin in the center and remove every other strip.
Seriously, how easy is that?
Next, paint the open areas with whatever color paint you choose. In my case, my client wanted to use one of Dixie Belle’s new Moonshine Metallics Paint. She chose Steel Magnolia. I cannot stress to you how beautiful these colors are! They add a gorgeous shimmer to any piece. The shimmer gets more pronounced as it dries.
I also added the Steel Magnolia Moonshine Metallic to all of the trim work. The drawers were all basically framed in shimmer.
Adding a Transfer
If you’ve never seen or used a rub on transfer, you’ve been missing out. A transfer takes a nice piece of furniture and transforms it into something really special. I used “Lovely Ledger” on this particular piece. The great thing about transfers, is that you can cut them in sections to use however you’d like. Here’s a little “how to” on adding a transfer.” It’s not the one I used on this piece. It’s actually not even the one I used on the piece I used in the tutorial. I ended up not liking it and re-did the entire piece.
See- not so difficult! I usually put two to three coats of sealer over the transfers to protect them. You can buy rub on transfers from me as well!
Finish with a Top Coat (if you want)
If you’re using Dixie Belle Paint, you actually don’t have to seal your piece. Our paint cures in about 30 days. But, if you’re like me with dogs, grand kids, husbands… I like that little extra added protection. Gator Hide is our toughest water resistant sealer. I usually reserve that for the top. I use our regular Satin Clear Coat for everything else.
Y’all be sure to follow me on Facebook since I post so much there. It’s the best place for updates.
Stick and Style Stencils add some easy flare to the sides of the drawers!
Line the drawers for a complete look.


March 22, 2023 @ 7:46 am
Beautiful!
March 22, 2023 @ 11:56 am
Thank you! 🙂
August 26, 2019 @ 2:25 pm
WAAAAAAIT….if you didn’t like the first transfer, what did you do?? Can you remove them or did you paint over and put on a different one????
August 26, 2019 @ 3:36 pm
Renee- I actually sanded the old transfer off and re-painted! AHHHH it was super frustrating. But, not my first rodeo. I’m notorious for adding something and then hating it… Those transfers are there to stay… whew- it’s a lot of work to “remove” them. You really just obliterate them.