Grapevine Wreaths- Elegant and Rustic
Grapevine wreaths are some of the most versatile wreaths you can make. Plaid ribbons and burlap create a rustic look and hydrangeas, roses, and peonies look absolutely elegant on the same wreath base. Holiday wreaths with a cross for Easter, a snowman for Christmas, or a jack-o-lantern for Halloween all work on a grapevine wreath as well. For my grapevine wreaths, I like to use floral wire to attach most elements. The grapevine makes a great base upon which to wrap your wire. However, some of the silk hydrangeas I use look much better when they are disassembled and thus hot glued onto the wreath. Whatever materials you choose to use- the grapevine wreath base makes a beautiful wreath as the following wreaths prove:

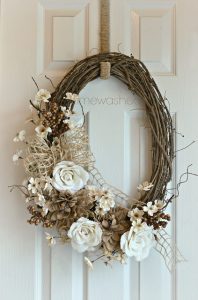
Becky at Timewashed created a lovely Victorian look wreath that has an interesting mix of textures. She picked up the flowers at Hobby Lobby and added an open mesh windowpane ribbon that really plays off the more formal flowers.
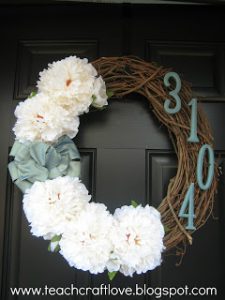
Dara Maria at Teach Craft Love created a wreath that incorporates address numbers. This is genius! A friend of mine told me that their entire street had this style of wreaths on each door. This wreath is not only gorgeous- it’s so functional as well; especially since internet maps don’t always identify the correct houses – on the most popular map site; our house shows to be about 6 doors down. The more address identifiers we have, the better!

Rebekah at Somewhere in the Middle created this absolutely fabulous wreath with trailing greenery and a pretty burlap bow. How elegant is this?!
I absolutely love the trend of the monogrammed wreath. This is a simple grapevine wreath but it’s just so pretty. Jamie at Mama, Mommy, Mom calls this beauty her “10 Minute Front Door Wreath” but you’d swear she spent longer creating it.

Nancy at Artsy Chicks Rule put her grapevine wreath together with items she already had on hand. That’s the awesome thing about the grapevine wreath base. There’s no reason to cover it up 100%. The grapevine wreath is a part of the beauty of the finished product. Look through your craft supplies… as long as you have a grapevine base, it doesn’t take much more to create something that you’d be proud to display.
Now for my contributions to the grapevine wreath gallery:

I love this happy looking wreath I made as a give away for my youngest daughter’s baby shower. Even though it uses lots of bright colors, it’s still sophisticated enough to grace any front door. I used a base of some greenery and filler smaller flowers to round out the pretty daisies.

This was a special order wreath I made for a beautiful young lady who lives down in Houston. Again, I started with some wispy greenery with small flowers then added a bow made from two types of burlap ribbon. I just love the chevron. I added some hydrangeas and roses to give it a romantic look to balance out the rustic look of the “T.” If you’ll notice, I also added some jute twine wrapped round the wreath just under the “T.” This was not just for visual interest, it was so I’d have a nice flat surface upon which to glue that part of the letter (this was in addition to wiring the letter to the wreath). I just didn’t want to take a chance on the letter swinging.

This wreath is now in my laundry room. We did a fantastic makeover with shiplap and industrial pipe shelving. I like how this wreath added that touch of femininity to the room. (Yes, it’s just a laundry room, but I believe that any room that you spend any time in should be pretty). I started with the base of greenery, as always, and added a cluster of flowers that actually came all on one stem. The little wooden sign came from Hobby Lobby.

Lastly, this is one of the most popular wreaths I’ve ever made. I have a video tutorial on exactly how I created this pretty grapevine wreath. This is a little different as I covered one side with some rolled burlap as well as the hydrangeas. I added the greenery after I had completed the wreath in the tutorial. This happens all the time; I finish a wreath and then take pics and decide that I’m really not finished after all. It’s always good to step back after you complete your projects, take some pics, and then decide if it needs anything else to make it more complete.
I hope you’re feeling inspired to create your own grapevine wreath. Remember- just be inspired by the wreaths you’ve seen- don’t compare your work to the work of others. Everyone has their own level of expertise and it takes time to perfect your technique. Just enjoy the process and make something beautiful!